
by Ryan Jacobs
Beer has lots in widespread with espresso. Each are extremely popular drinks. Each have the utilitarian customers of the drinks in addition to those that contemplate themselves connoisseurs. And each of those could be made in a reasonably straightforward vogue at dwelling yielding very optimistic outcomes. And, curiously sufficient, sure forms of beers are nicely complemented by espresso. I will likely be sharing a recipe I created that’s an espresso stout utilizing home-roasted espresso.
The Espresso/Beer Connection
As a homebrewer who additionally occurs to be obsessive about espresso, I discovered that too lots of the espresso or espresso-flavored stout recipes I discovered appeared to contemplate espresso extra of an afterthought than an vital issue within the success of the beverage. I’ve at all times discovered it odd that brewers would take a lot time to pick simply the best hops, yeast, and ideal water chemistry, solely to say one thing so common as, “Add a pound of cracked espresso to the brew pot.” Frivolously cracking espresso is meant to compensate for the longer extraction time within the brew, however over-extracted espresso is as undesirable within the beer as it will be by itself. Some homebrewer recipes even go so far as advising prompt espresso as an ingredient. That is insupportable recommendation. Over a number of years, I’ve tried a number of strategies, and the one I most loved is the one which I’m about to share.
The fundamental substances for making beer are water, sugar, hops, and yeast. Various the quantities and particular person qualities of every fundamental ingredient will yield a distinct tasting beverage.
The fundamental tools a homebrewer wants are:
- Boiling Kettle
- Fermenting Tank (Carboy)
- Racking Gear (Cane, Tubing, Bottle Filler)
- Bottles
- Caps
- Bottle Capper
Brewing In a Nutshell
At a really excessive stage, these are the fundamentals of homebrewing:
- Sanitation – Every thing you contact could be contaminated with micro organism which may trigger skunked beer. Sanitize all the pieces that can are available in contact along with your beer earlier than or after boiling. Utilizing sanitary dealing with practices is on the prime of my record for brewing. The most effective crafted/designed beer could be ruined by a failure to maintain it clear.
- Make the Wort – On this step, you might be cooking malts in an effort to break down their sugars and extract them to create a sweetened liquid. The sugary liquid is what will likely be consumed by the yeast later. That is achieved by including water and malt/malt extract into the boiling kettle. Since most small homebrewers don’t have kettles giant sufficient to carry 5 gallons, the wort is definitely concentrated, which implies we are going to add chilly water later to make up for the total quantity.
- Add the Hops – That is truly a part of creating the wort. Relying in your recipe, you’ll add a collection of hops at completely different occasions into the boil. Hops serve the aim of bittering the beer to counteract the candy style of the sugary malt. Additionally they are a light astringent, which helps to maintain the micro organism content material low. Lastly, they supply aroma and taste to the beverage. The hop additions are typically categorized as both ‘Bittering’ or ‘Aroma’ hops. The bittering hops go in earliest as a result of the fragrant compounds of the hops will boil out. Aroma hops go within the boil final in order to protect these compounds so they are going to keep within the beer.
- Chill the Wort – That is to be achieved as shortly as potential. The temperature of your wort needs to be near the fermenting temperature listed for the yeast that you simply selected. Principally, we try to chill it to the purpose that it received’t kill the yeast. A trick that I exploit is to maintain water within the fridge; I will likely be including this water to the focus in order that it helps to convey down the general temperature faster.
- Pitch the Yeast – That is merely including the yeast to the wort. As soon as this step is full, it’s now not wort, it’s beer.
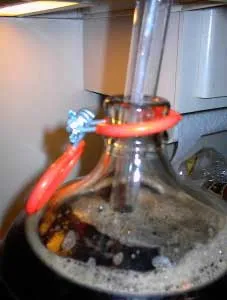
- Main Fermentation – That is the method of permitting the yeast to devour the sugar in a sanitized setting. When yeast eats the sugar and metabolizes it, two crucial molecules are given off: Alcohol and Carbon Dioxide. In major fermentation, we’re involved with creating alcohol and letting the CO2 out. That is achieved by affixing an airlock on the carboy which lets gasoline escape because of stress however doesn’t let something in. After taking some measurements, you will discover out when fermentation is full.
- Secondary Fermentation – This step just isn’t obligatory when you keg your beer. Nevertheless, when you bottle your beer, this step is vital. On this step, a really calculated quantity of unhopped wort is created and added again to the beer. This may create extra CO2 and alcohol, however since we’re bottling the beer subsequent, the gasoline will likely be trapped within the bottle which serves to carbonate it.
- Bottling – This includes placing the beer into bottles and capping the bottles with a capper.
- Consumption – Get pleasure from your creation and share it with your folks.
As is true with espresso, trying previous the fundamentals of homebrewing could be very complicated certainly. When you’ve got the persistence and the initiative, it may be each bit as rewarding as your espresso pastime. For the already skilled homebrewer, tweak this recipe as a lot as you want and have enjoyable. For the beginner, keep on with this recipe the primary time till you turn out to be acquainted with the essential process.
Our instance: Espresso Stout
This homebrew combines the flavors of a chocolate-style stout with freshly brewed espresso to kick it up a notch. I additionally used espresso which I roasted and brewed myself. I totally consider that the general recent style of this brew has all the pieces to do with utilizing high quality substances — particularly the espresso. For this recipe, I used a custom-blended espresso designed for this stout.
The Espresso Mix
Mixing espresso just isn’t altogether completely different from deciding on the hop additions for a beer. The purpose is actually the identical: to achieve a sure taste by using the completely different traits of the substances in particular manners. Simply as bittering hops will present the bottom bittering on your hops, so does choose a base bean for espresso to serve the identical goal in your mix.
Past regular espresso mixing, you need to contemplate the aim for which the espresso will likely be used. Will it’s used primarily in milk-based drinks, Americanos, straight-up, or in a stout? For the reason that stout is a chocolate stout, it is smart to try to complement that taste with the espresso. You’ll discover that this mix isn’t extraordinarily darkish or oily for an espresso, however so far as espresso goes, I’ve by no means discovered extraordinarily oily blends to be notably good. Moreover, this brewed espresso will likely be added to 5 gallons of beer! It seems that extra oils added to beer kill the top retention and thus the general physique of the beer. Evidently, a really oily stout just isn’t very fascinating.
Right here is my espresso recipe:
- 50% Brazil Cerrado – This would be the base for our espresso. It has a beautiful physique to enhance the chocolate flavors within the stout, in addition to is comparatively low in acidity, which can assist in maintaining this on the palate slightly bit longer. This will likely be roasted previous the second crack or till oil reveals.
- 10% India Monsooned Malabar – This bean will work very nicely to assist stability the sweetness we are going to introduce with the Ethiopian bean. It additionally has some very highly effective, but fast ending taste traits which I fairly like in my espresso. It’s roasted to full metropolis.
- 10% Guatemala Huehuetenango – Carries and brightens the opposite flavors. Roasting this bean simply previous the second crack tends to tame the extra fruity traits of this bean. Nonetheless, the liveliness of this bean stays and it’s now comparatively impartial traits assist improve the remainder of the mix.
- 20% Ethiopian Harrar Horse – Gives a robust taste with floral and chocolatey notes. I’ll roast this a bit previous full-city.
- 10% Kenya AA – Roasted full metropolis, this espresso has extraordinarily highly effective taste traits which shine by way of properly in our mix. I’ve at all times considered Kenyan AA beans as being considerably winey and the identical is true for hops. This bean, in my thoughts, makes the bridge between the espresso flavoring and the hop flavoring of the stout.
You must be happy to strive one other espresso mix after you see how this one seems. The vital factor is that by roasting it your self, you recognize precisely how outdated and the way recent the espresso is. Similar to hop varieties fluctuate from yr to yr and crop to crop — so do coffees. Homebrewers like to tweak, and with espresso, there may be loads of tweaking that may be achieved!
Should you want to make use of a pre-blended espresso to roast, I like to recommend the Liquid Amber Espresso Mix out there from Candy Maria’s. Should you aren’t a house roaster, find a very good espresso mix from a neighborhood roaster.
Elements
- 4# Darkish Malt Extract
- 3# Mild Malt Extract
- 5 ozDark Malt Extract (for priming)
- 1# Crystal Malt 90L (Entire Grain, Crushed)
- 1/8# Roasted Barley (Entire Grain, Crushed)
- 1/8# Black Patent Malt (Entire Grain, Crushed)
- 1/4# Chocolate Malt (Entire Grain, Crushed)
- 2 ozNorthern Brewer Hops
- .5 ozWillamette Hops
- 16 photographs of Recent Brewed Espresso
- Irish Ale Liquid Yeast
Process
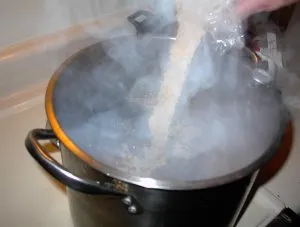
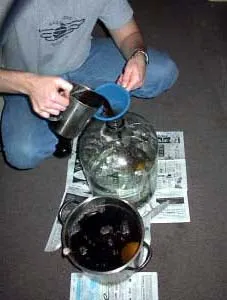
Add 1.5 gallons of water to the boiling kettle. Put all the grains right into a grain bag and tie it up as proven beneath.
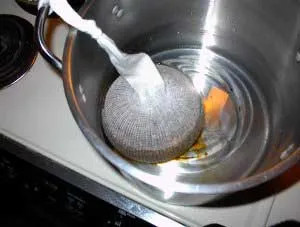
Since we’re utilizing distilled water, we are going to modify the water hardness by including brewing salts. For this recipe, I’ve added 2 tsp. Calcium Chloride and 1 tsp. Magnesium Sulfate. It is a crucial step that, if missed, will render your beer lifeless. The salts give physique to the beer and in addition assist to extract sugars from the grains. This partial mash ought to cook dinner for half-hour at 160°-170°F.
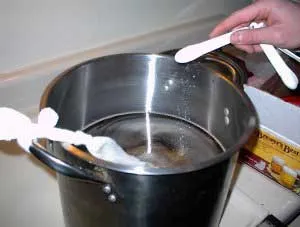
After this partial mash has been accomplished, take away the grain bag rigorously from the kettle and add the malt extract with simply over a half-gallon of water, taking nice care to maintain stirring till totally dissolved. It is rather vital to concentrate to forestall a “boil-over” from occurring at this stage. At thirty minutes into the boil, we are going to make our first hop addition. We’ll add 1.5 ozof the Northern Brewer hops and proceed boiling.
Multitasking
Whereas we’re ready for the following hop addition, we will put together a number of issues. First, we put together a hop bag by inserting the remaining .5 ozof Northern Brewer and the .5 ozof Willamette Hops into the bag which can make up our second hop addition. We can even sanitize the carboy. This may be achieved with both oxidized bleach cleaners or an iodophor answer. I want the iodophor because it sanitizes quicker and requires no rinsing. Whichever you select, combine the cleaner to the energy indicated on the directions and add this to the carboy. Then, use the bottle brush to swirl the answer round and ensure all the surfaces has been lined. You must spare no effort in sanitizing your tools.

Placing all of it collectively
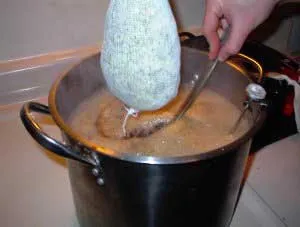
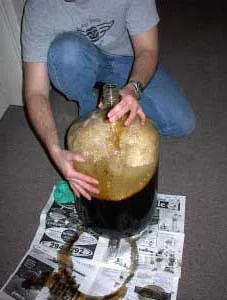
After now we have cleaned the carboy, we add the remainder of the water (3 gallons) to it. At 55 minutes into the boil, we add the second hop addition to the boil which can cook dinner for 5 minutes extra earlier than we take away it from the warmth. Then, attempt to cool the new wort down for fifteen minutes by placing the kettle in a big physique of water comparable to a sink or bathtub and surrounding it with chilly water. Whereas that is cooling down, we are going to start brewing espresso. For this recipe, we are going to brew 16 photographs or 16 ozof espresso. Add this to the wort.
I ought to point out the significance of brewing the espresso. Some recipes for so-called ‘espresso’ stouts name for including cracked espresso to the boil, and even into the carboy throughout fermentation. These beers often find yourself having a style of over-extracted espresso. Brewing espresso correctly, nonetheless, preserves the integrity of the espresso taste even after weeks within the bottle. Please don’t skimp in your espresso.
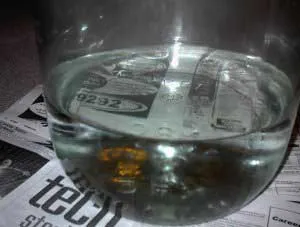
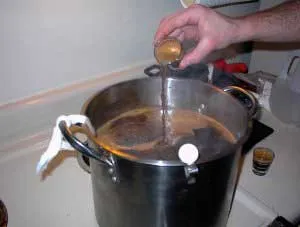
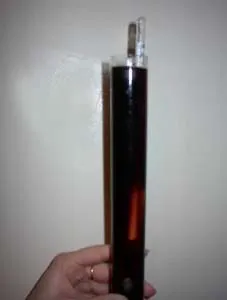
Subsequent, we are going to funnel the wort into the carboy to combine with the chilly water. After this, we are going to take a hydrometer studying by pouring a pattern of the wort right into a hydrometer jar. We’ll take a studying to find out the Unique Gravity of the beer. Our studying reveals a studying of 1.060 or a possible alcohol % of roughly 8%.
The following step is to ‘pitch’ the yeast, and rock the carboy forwards and backwards for a minute or two gently. This mixes the yeast all through the beer and helps to oxygenate the beer which is useful to the fermentation course of.

The Ready (Hardest Half)
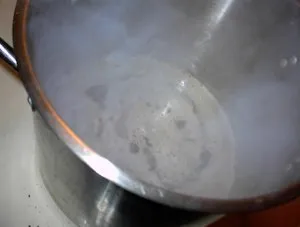
The following step is to place the carboy in a cool, darkish place and wait whereas the fermentation occurs. Throughout this time, you may observe the effervescent motion of your airlock because the CO2 escapes. As soon as this effervescent motion is stopped, fermentation is mostly full. Usually, this takes between one and two weeks. At this level, it’s protected to start the second fermentation. That is achieved by boiling a quart of water after which including 5oz. Dry Malt Extract or priming sugar. This could boil for no less than 20 minutes in order to verify it’s sanitized. After it has cooled, it’s poured into the beer. Subsequent comes bottling.
Bottling
After we sanitize the caps and bottles, we are going to sanitize the racking cane, tubing, and bottling stem. The racking cane is ready within the carboy as pictured beneath and is used to siphon the beer out of the carboy and into the bottles. The best way this works is by gravity siphoning, not by the unsanitary technique of sucking out the beer manually. One small observe about bottles: when you use bottles that you’ve saved, solely save the bottles that aren’t twist-offs. It’s tough for a homebrewer to place a very good seal on these bottles with the usual bottle capper. You may also buy bottles at your homebrew retailer in case you are uncertain what form to purchase.

To start out the siphon, we fill the tubing and bottling stem with clear water, taking nice care to not contact it with our arms. Then, we connect the opposite finish of the tubing to the racking cane. Getting a very good seal between the tubing and the cane is vital. Subsequent, we are going to place a clear glass on the ground whereas the carboy is elevated on a desk or counter.
We’ll then take the bottling stem and push it down within the glass in order to depress the valve on the bottling stem which permits liquid to circulation out of it. What occurs is that because the clear water exits the tubing, it creates a siphon, which can begin pulling the beer out of the carboy.
As quickly because the liquid within the glass turns into beer coloured, pull the stem out of the glass to shut the valve and cease the circulation. Now we’re prepared to start filling the bottles in the identical method, by pushing the bottling stem right down to let the beer circulation into the bottle and releasing it when it’s lower than full — simply above the neck of the bottle.
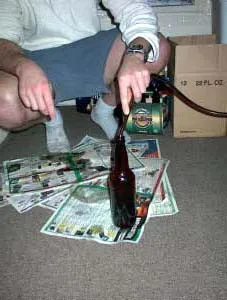
After the bottle is stuffed, we are going to place a cap on prime and use our capper to crimp the cap securely on. As soon as this step is full, the beer is able to sit for every week at a minimal. The overall rule of thumb is that the stronger a beer is when it comes to alcohol or hop content material, the longer it ought to mature earlier than consuming. This offers it a chance to mellow a bit.
It’s good to style your beer at a number of junctures to get a way of its growth. This specific brew will likely be optimum between 3 and 4 weeks after being within the bottle. As soon as this occurs, retailer it within the coldest, darkest place you will discover till you might be able to benefit from the brew.
Conclusion
Now that the beer is full, the one step left is to devour it. To serve the homebrew, at all times decant the beer right into a glass slowly, and cease pouring simply because the yeast sediment begins to come back out. Whereas the yeast received’t hurt you, it is going to have an effect on the general taste of the beer. Some individuals like the flavour, some don’t, so it’s best to experiment a bit. The Espresso Stout is the proper marriage between recent dwelling roasted espresso and home-brewed ale. The following time you end up unable to decide on between espresso or beer, have each.
Sources
Espresso Mixing Methods – Steerage on developing a great espresso mix.
Espresso Mixing For the Dwelling Roaster – INeedCoffee article
Printed on