

")
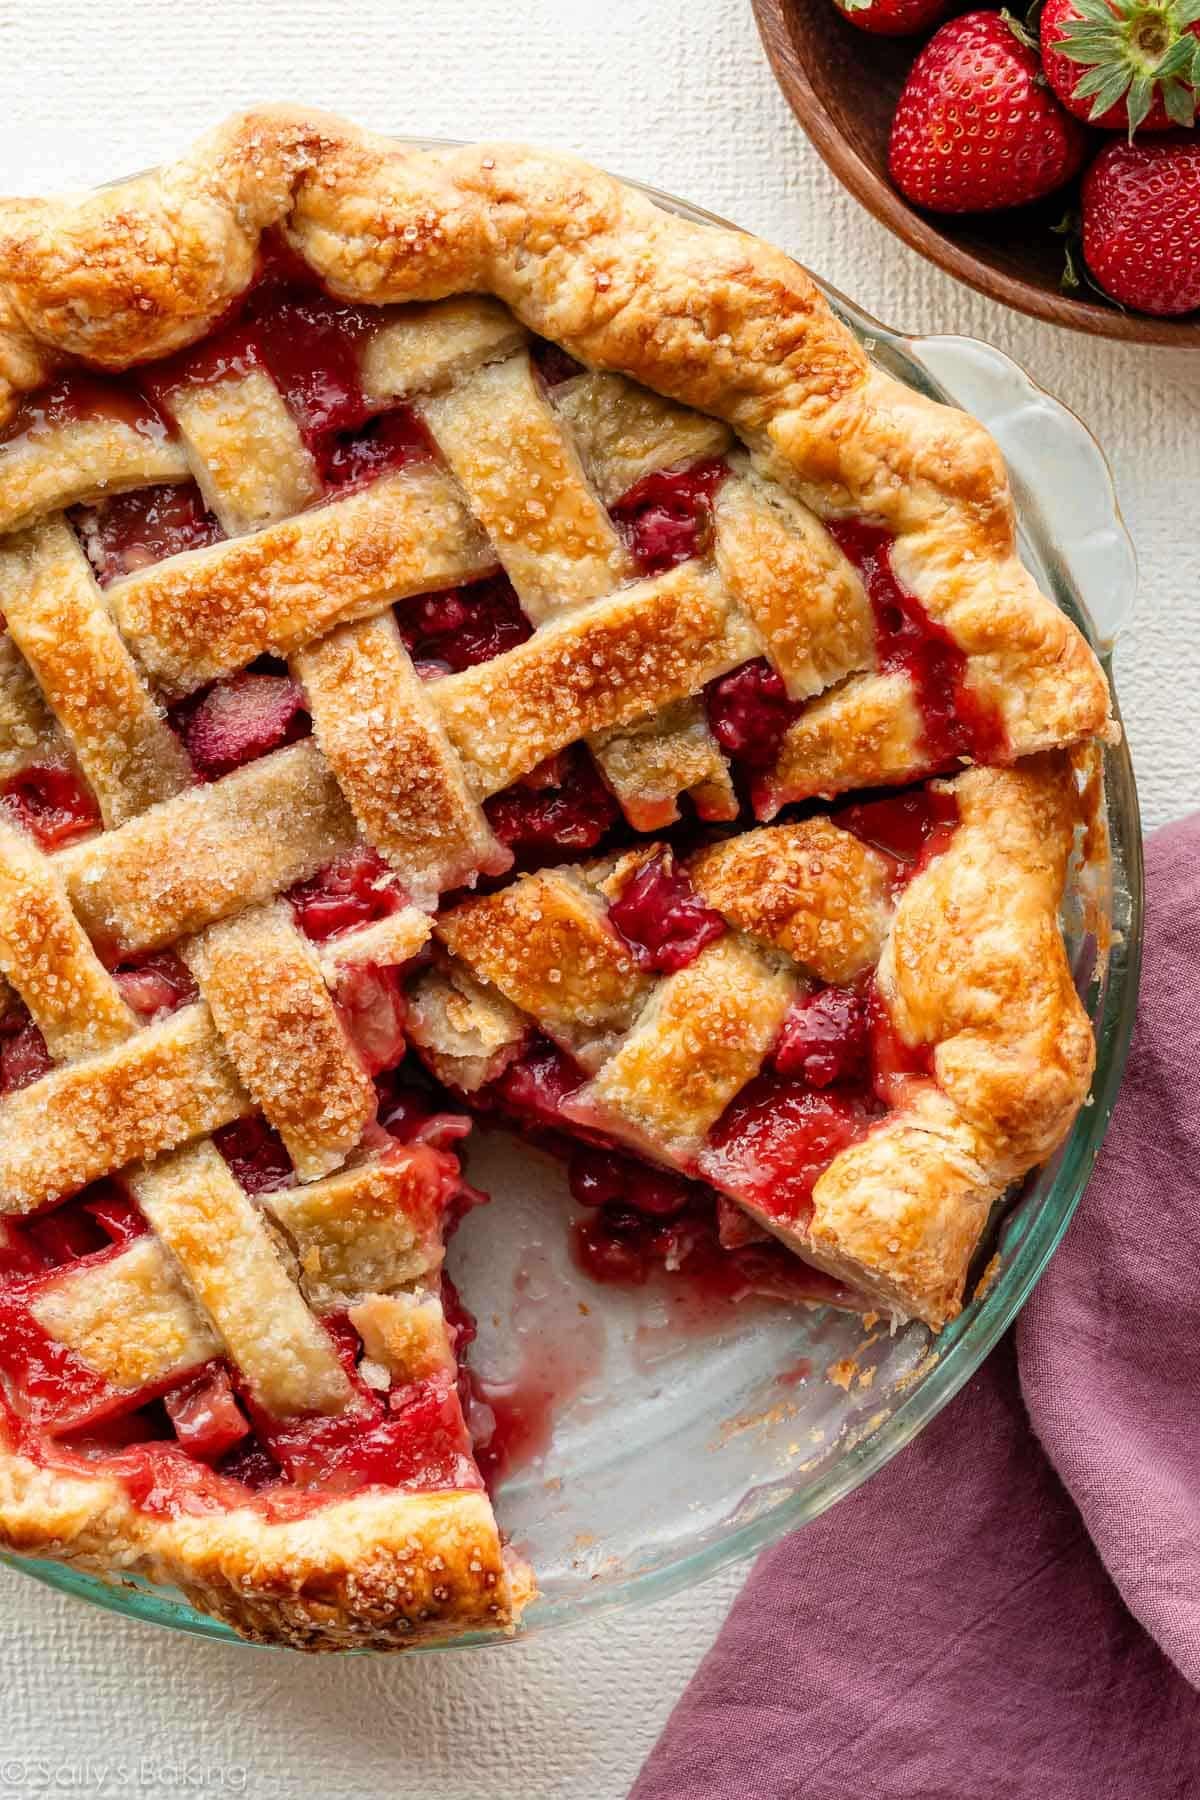
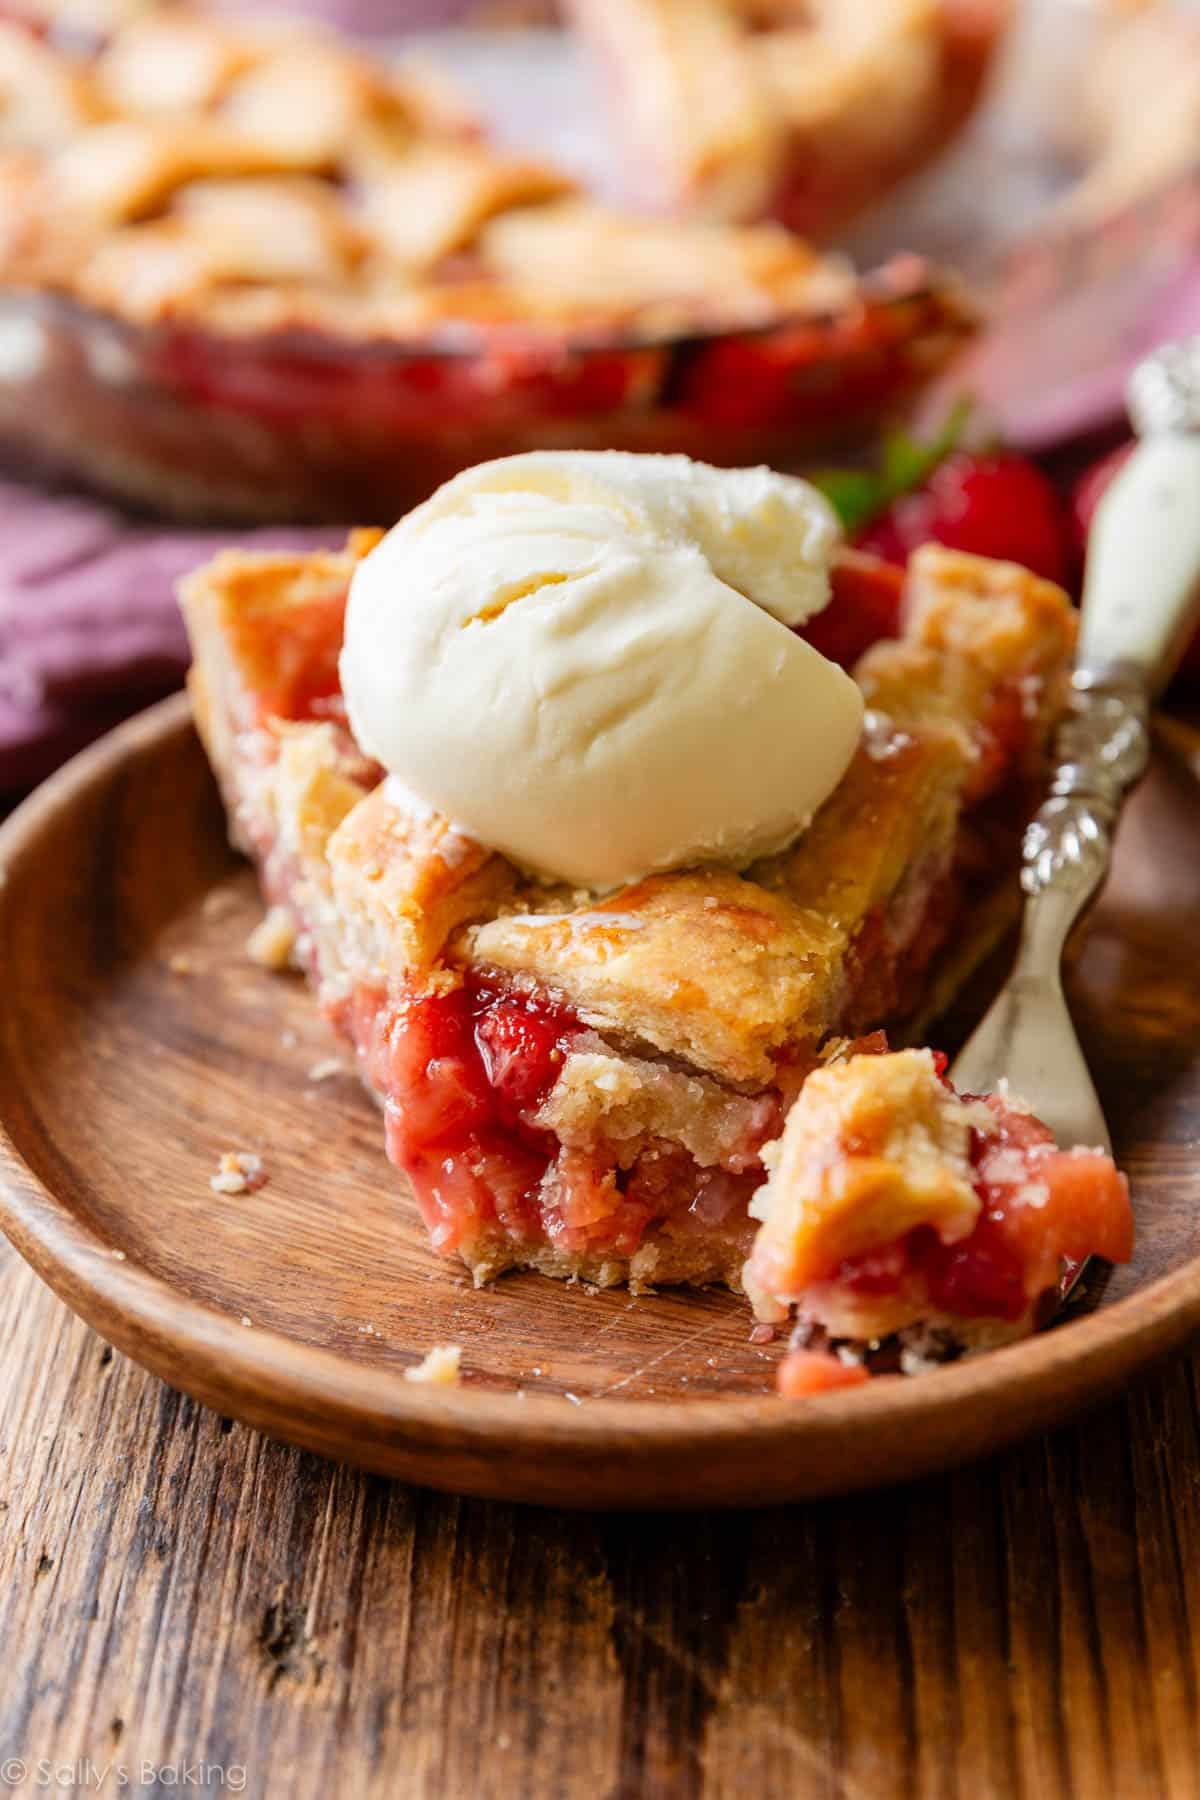
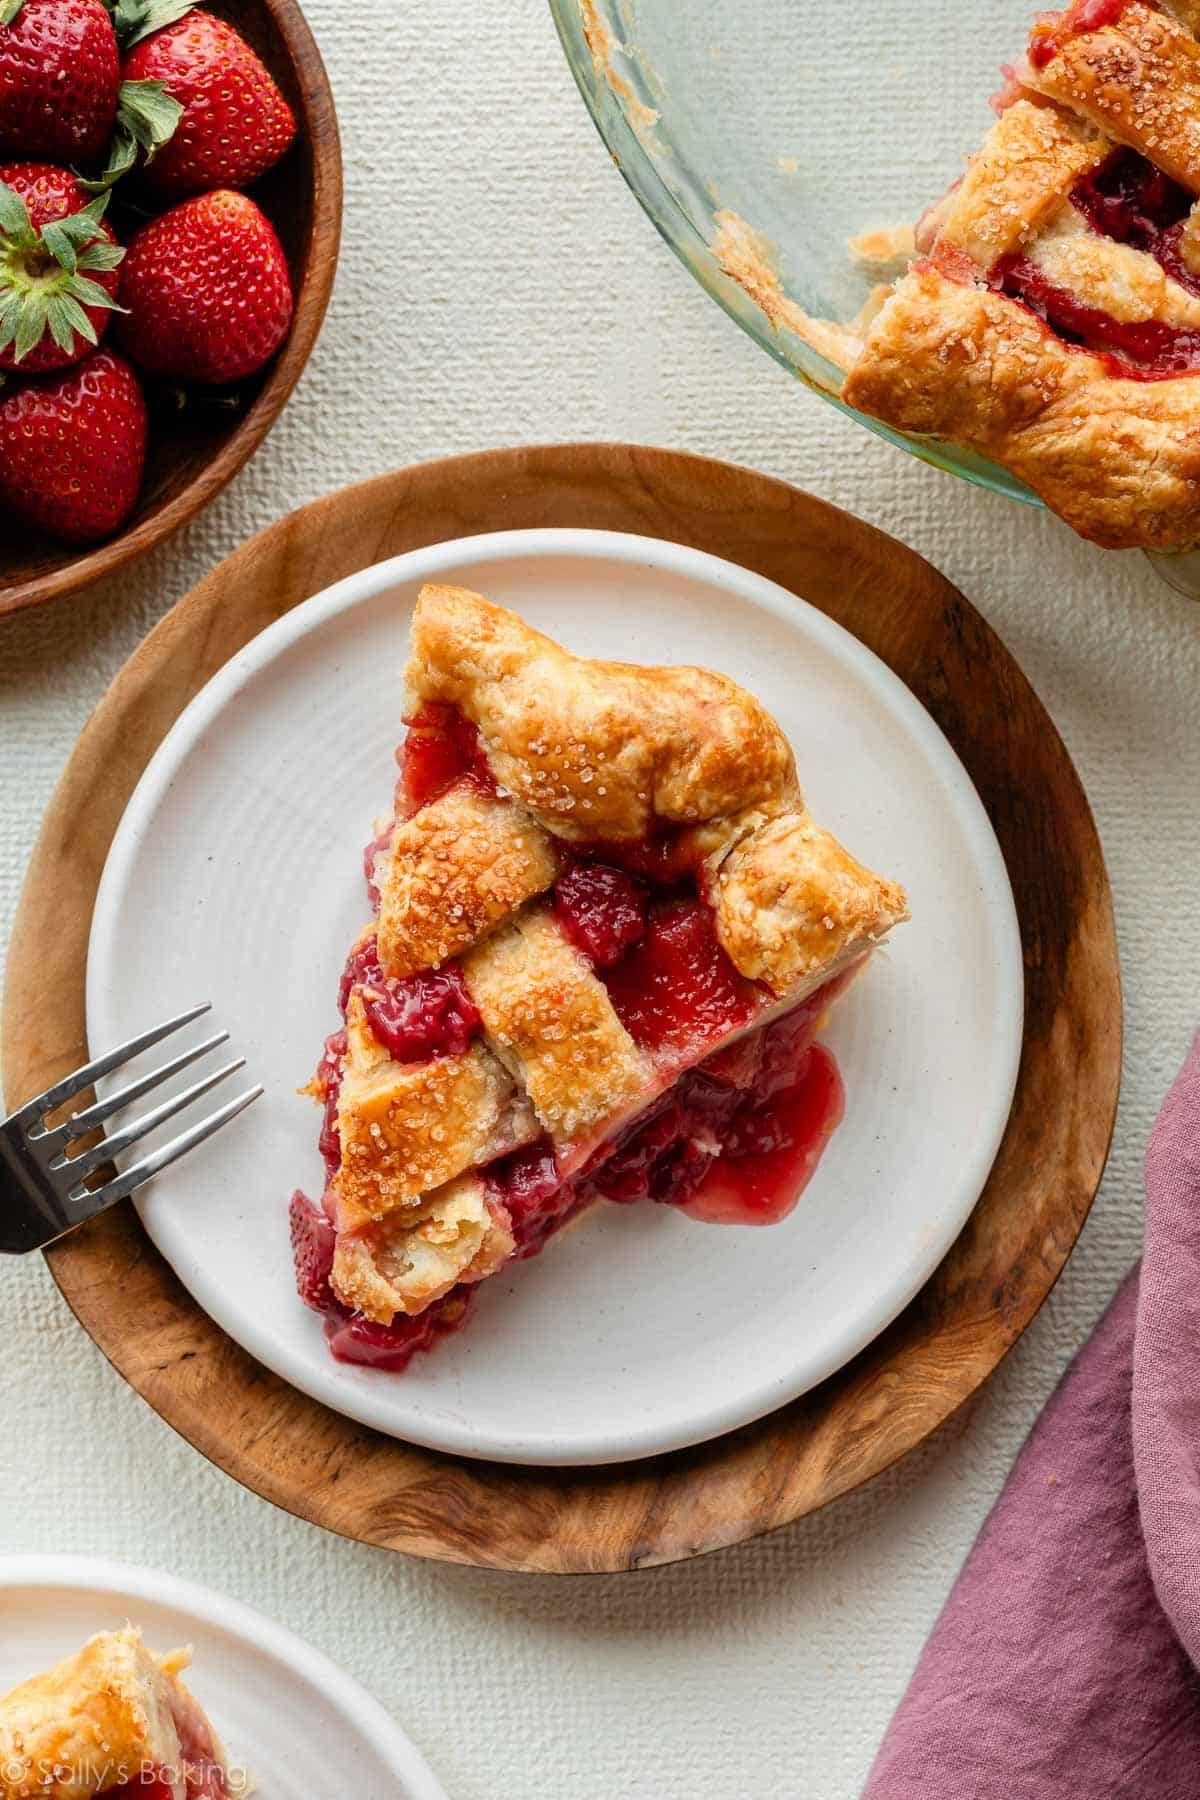
This strawberry rhubarb pie combines juicy strawberries, tart rhubarb, and a home made flaky all-butter pie crust for a basic spring and summer time dessert. The filling bakes up thick and jammy, so each slice holds its form fantastically. As all the time, letting the pie cool fully earlier than slicing is non-negotiable for a thick, set filling.
I initially revealed this recipe in 2016 and have since added new images, a video tutorial, and extra success ideas, together with an elective stovetop step that helps assure a thick pie filling.
Candy strawberries and tart rhubarb are the final word spring pie duo, and this up to date strawberry rhubarb pie recipe will get the stability excellent. With a flaky all-butter pie crust and a thick, jammy filling that slices fantastically, that is the type of basic fruit pie that’s well worth the wait.
The filling makes use of strawberries, rhubarb, a contact of orange juice, and simply sufficient cornstarch to maintain the pie from turning soupy, which is a standard problem with strawberry rhubarb pie. Should you’ve ever had a strawberry rhubarb pie flip right into a runny mess while you slice it, comply with this recipe to forestall that from ever occurring once more.

Why You’ll Love This Strawberry Rhubarb Pie
- Completely balanced sweet-tart taste from contemporary strawberries and rhubarb
- Thick, jammy filling that slices simply
- Flaky, buttery home made pie crust
- An exquisite make-ahead spring or summer time dessert
Begin With the Pie Crust
A sturdy, flaky pie crust is crucial for holding the juicy filling. I like to make use of my all-butter pie crust, which makes sufficient for each a backside and a high crust. You possibly can additionally use this flaky pie crust as an alternative, which makes use of a mixture of butter and shortening.
Begin the dough forward of time as a result of it wants to relax for not less than 2 hours earlier than rolling out.
Don’t wish to mess with pie crust? If in case you have a duplicate of Sally’s Baking 101, see web page 164 for a Easy Strawberry Rhubarb Crumble!
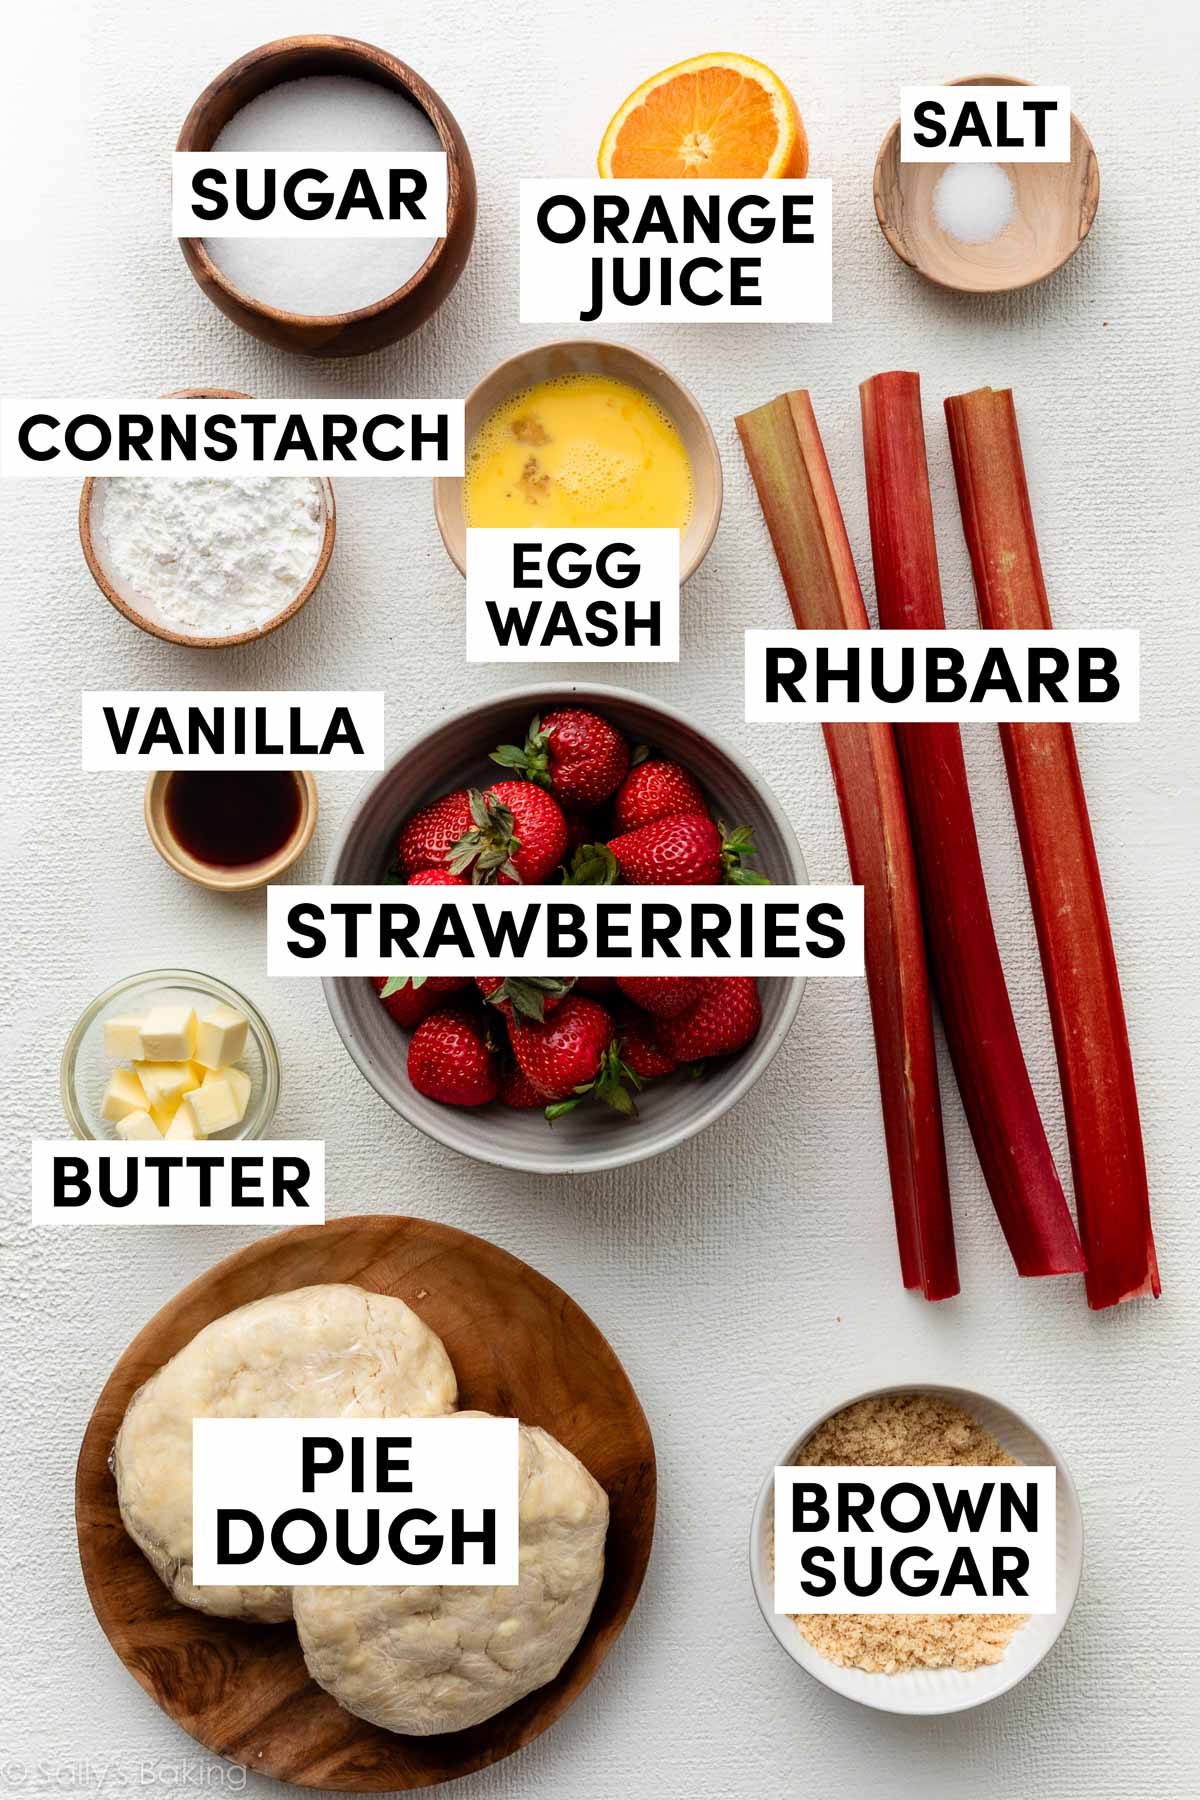
Substances That Make This Pie Work
- Recent Rhubarb: Search for agency, crisp stalks with a deep pink or crimson shade. Slice the rhubarb into uniform 1/2-inch items so it softens evenly whereas baking.
- Recent Strawberries: Use ripe, flavorful strawberries and chop them into small chunks. Since strawberries launch extra liquid than rhubarb, I take advantage of barely extra rhubarb than strawberries for one of the best filling consistency.
- Sugar: I take advantage of each white and brown sugar right here, for some taste depth in addition to sweetening that tart rhubarb.
- Cornstarch: Our thickening agent—completely important.
- Salt: To reinforce and stability all of the flavors.
- Orange Juice: A splash of orange juice brightens the whole lot up and makes the flavors pop.
- Vanilla: Vanilla provides heat and depth. It’s an excellent pairing on this strawberry vanilla crisp, too.
- Butter: Dot the pie filling with small cubes of chilly butter earlier than making use of the highest crust. Why? It provides buttery richness and truly helps forestall the formation of bubbles on the filling’s floor.
How you can Forestall a Runny Strawberry Rhubarb Pie Filling
One of many greatest challenges with home made strawberry rhubarb pie is extra liquid. Strawberries launch a number of juice whereas baking, which may result in a runny filling. This recipe makes use of cornstarch to assist thicken the liquid because the pie bakes, making a filling that’s juicy however sliceable.
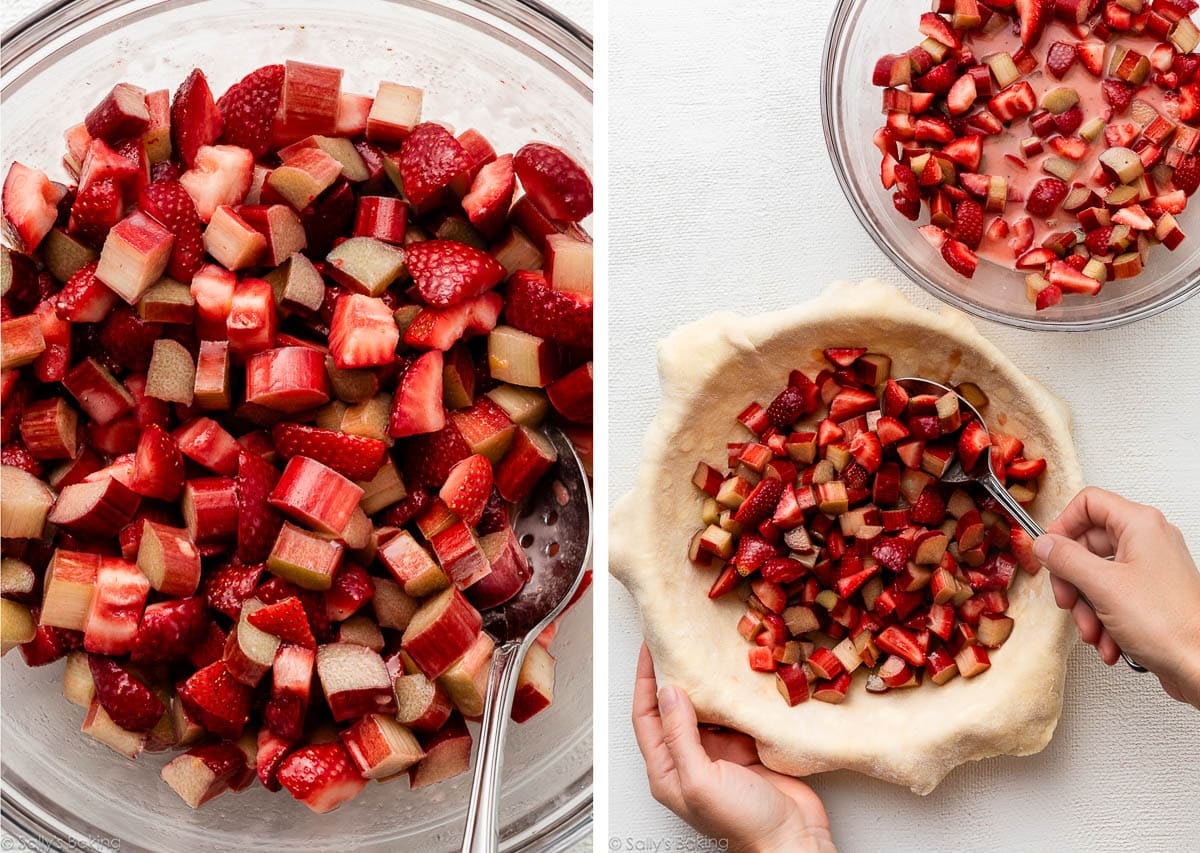
After you mix the filling components collectively, set it apart and roll out the pie dough in your pie dish. Throughout this time, your filling is already working because the sugar pulls juices from the fruit.
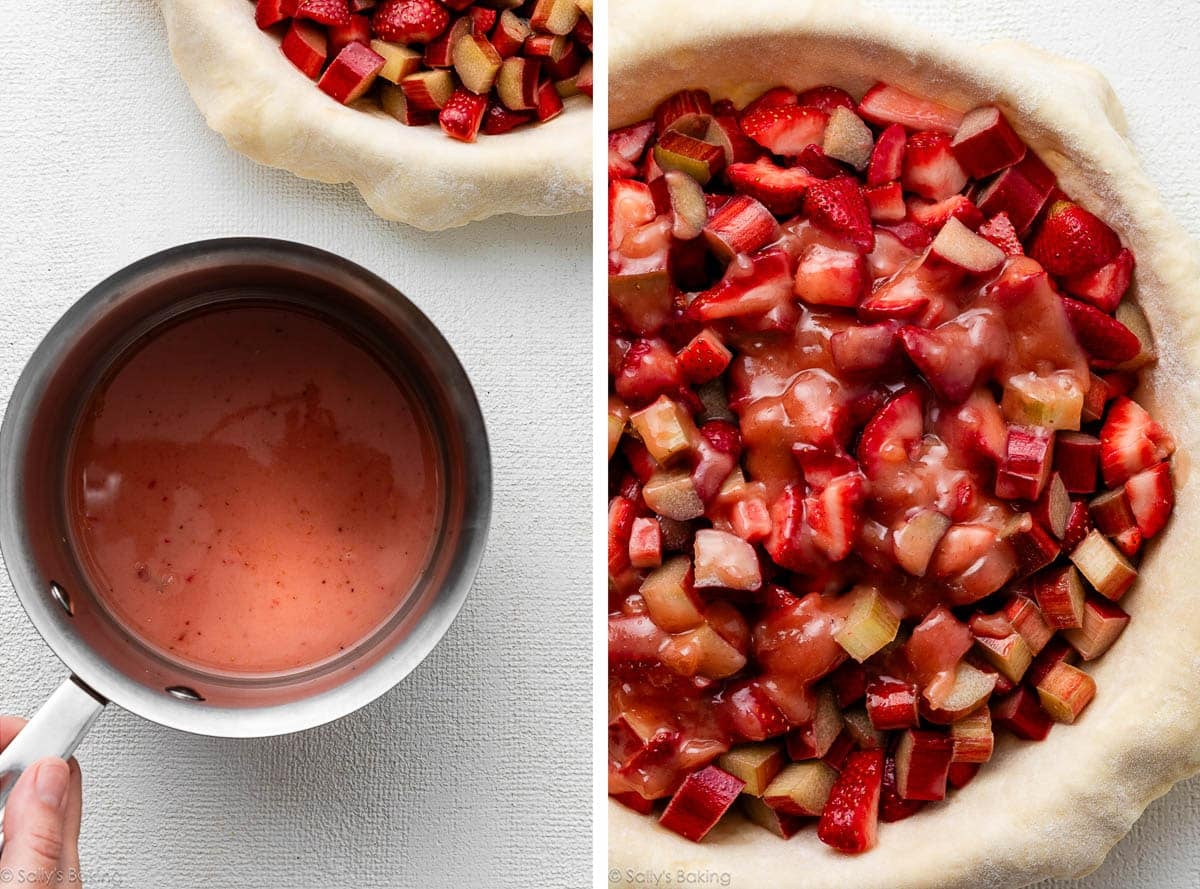
While you’re able to assemble your pie, for those who discover a number of juice has pooled on the backside of the bowl with the filling, it may very well be that your berries have been further ripe otherwise you prepped the filling prematurely and it sat for some time. If that occurs, use a slotted spoon to switch the fruit to the pie crust, however don’t discard the juice—it’s the place a number of the cornstarch finally ends up, and we want it!
As a substitute, pour the juice from the bowl right into a small saucepan. Chances are you’ll solely have a couple of Tablespoons, however that juice is full of taste and cornstarch, so don’t waste it. Scale back the juices in a saucepan over medium-low warmth, only for a couple of minutes till it thickens right into a syrupy consistency, then let it barely cool for about 5 minutes earlier than pouring over the filling within the pie. Gently stir it into the filling as finest you possibly can.
This elective pre-cooking step helps activate the cornstarch earlier than the pie goes into the oven, supplying you with further insurance coverage that the filling will thicken correctly. I take advantage of this identical methodology in my cherry pie and blueberry peach pie, and it ensures these juicy fruit fillings arrange properly.
After a couple of minutes on the range, the juices will thicken rapidly right into a jammy, syrup-like consistency. Pour the thickened juices over the pie filling, then gently stir and toss to distribute them all through the filling:
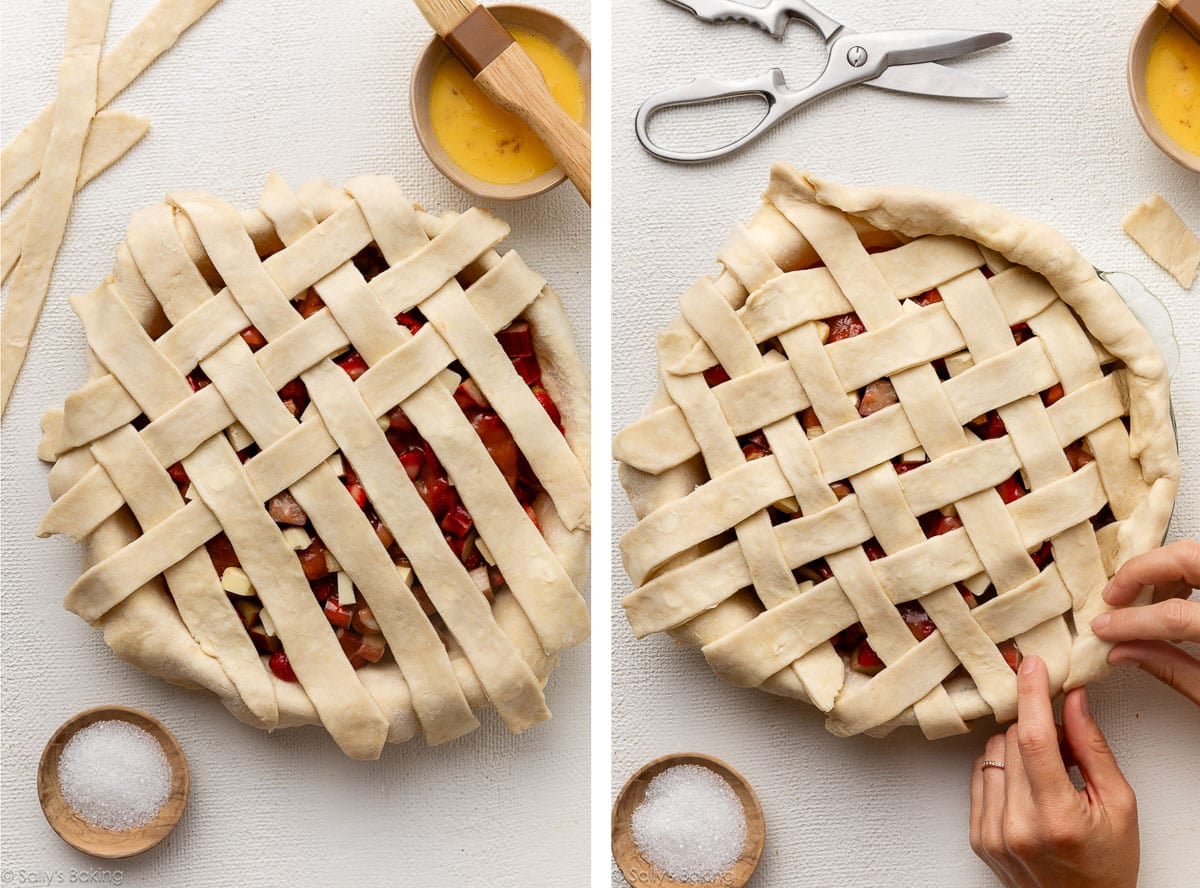
Lattice Pie Crust
Now it’s time so as to add the highest crust. A lattice topping not solely seems to be lovely, it additionally permits steam to flee so the filling can thicken correctly. Should you’re new to working with pie dough or want slightly refresher, take a look at my tutorial on easy methods to lattice pie crust.
You possibly can even skip the highest crust and use the crumble topping from our blueberry crumble pie. A number of choices!
Don’t Neglect the Ending Touches
These are fast and simple steps that make a world of distinction, consider me!
- Butter: Dot the filling with small cubes of butter earlier than including the highest crust. This provides richness, helps create a extra cohesive jammy filling, and even helps forestall bubbles from forming on the filling’s floor. We do the identical factor once we make peach pie.
- Crimp or flute the perimeters: As soon as your lattice is assembled, you’ll wish to crimp or flute the pie crust to complete it off. I fluted the pie crust in these images.
- Egg wash: An egg wash is just an egg blended with milk (or water) and you employ it just about everytime you’re baking pie dough… in addition to different formed dough, similar to stromboli, home made bagels, brioche, choux pastry, croissants, and so forth. Egg wash helps develop that lovely golden sheen. With out it, the baked dough seems to be boring and lackluster.
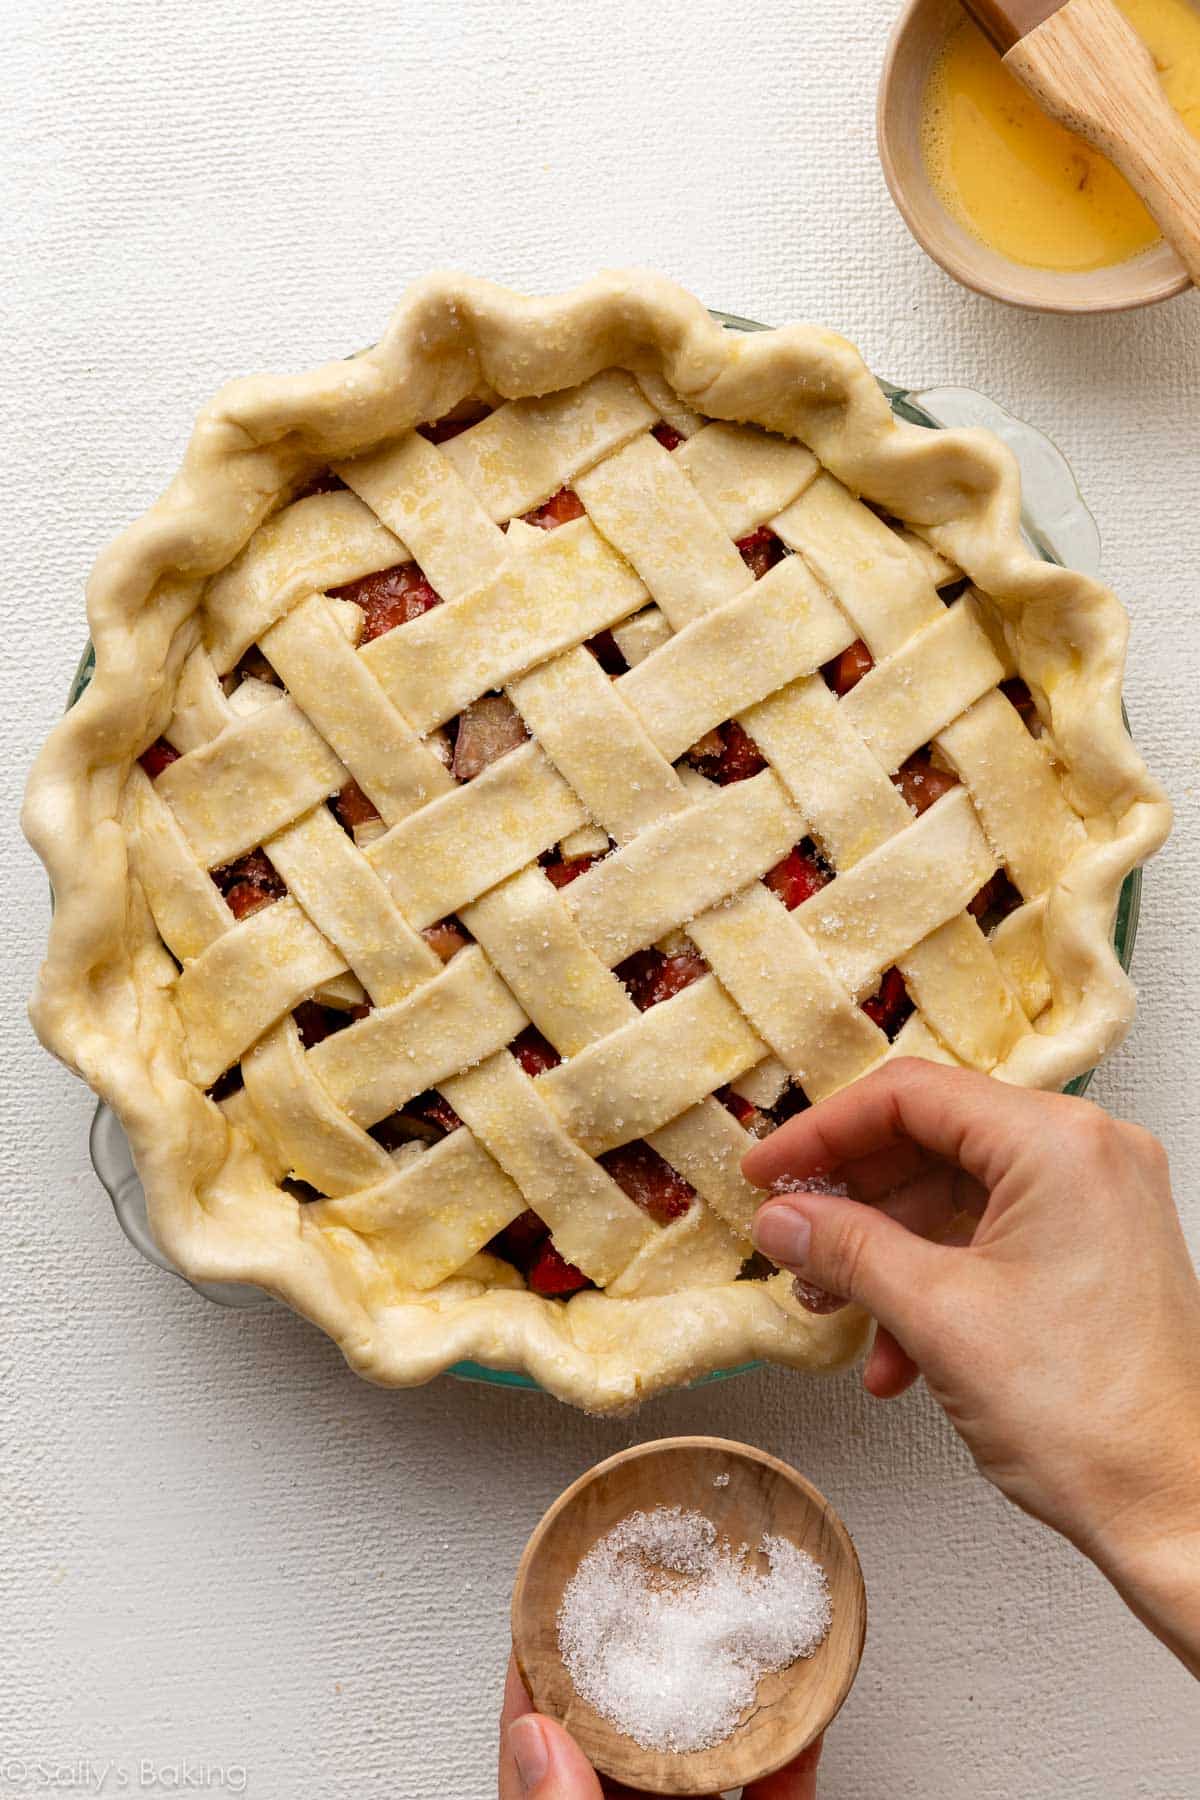
- Coarse sugar: That is elective, however I like ending candy pies with coarse sugar as a result of it provides slightly crunch and sparkle. I normally use Sugar within the Uncooked or these coarse sugar sprinkles, each of which will be discovered within the baking aisle of main grocery shops or on-line.
Now your pie is able to bake! I like to recommend inserting a baking sheet (lined with parchment for straightforward cleanup) on the rack under the pie, to catch any juices which will bubble over.
Begin the Pie at a Excessive Oven Temperature
Why do some pie recipes name for an initially scorching oven temperature that you simply finally decrease? Baking this pie at 400°F (204°C) for 20 minutes helps set the pie crust form, and prompts the cornstarch within the filling (as does heating it on the range). After that, scale back the oven temperature all the way down to 375°F (190°C) to proceed baking the pie. We use this identical trick once we make blueberry pie and triple berry pie.
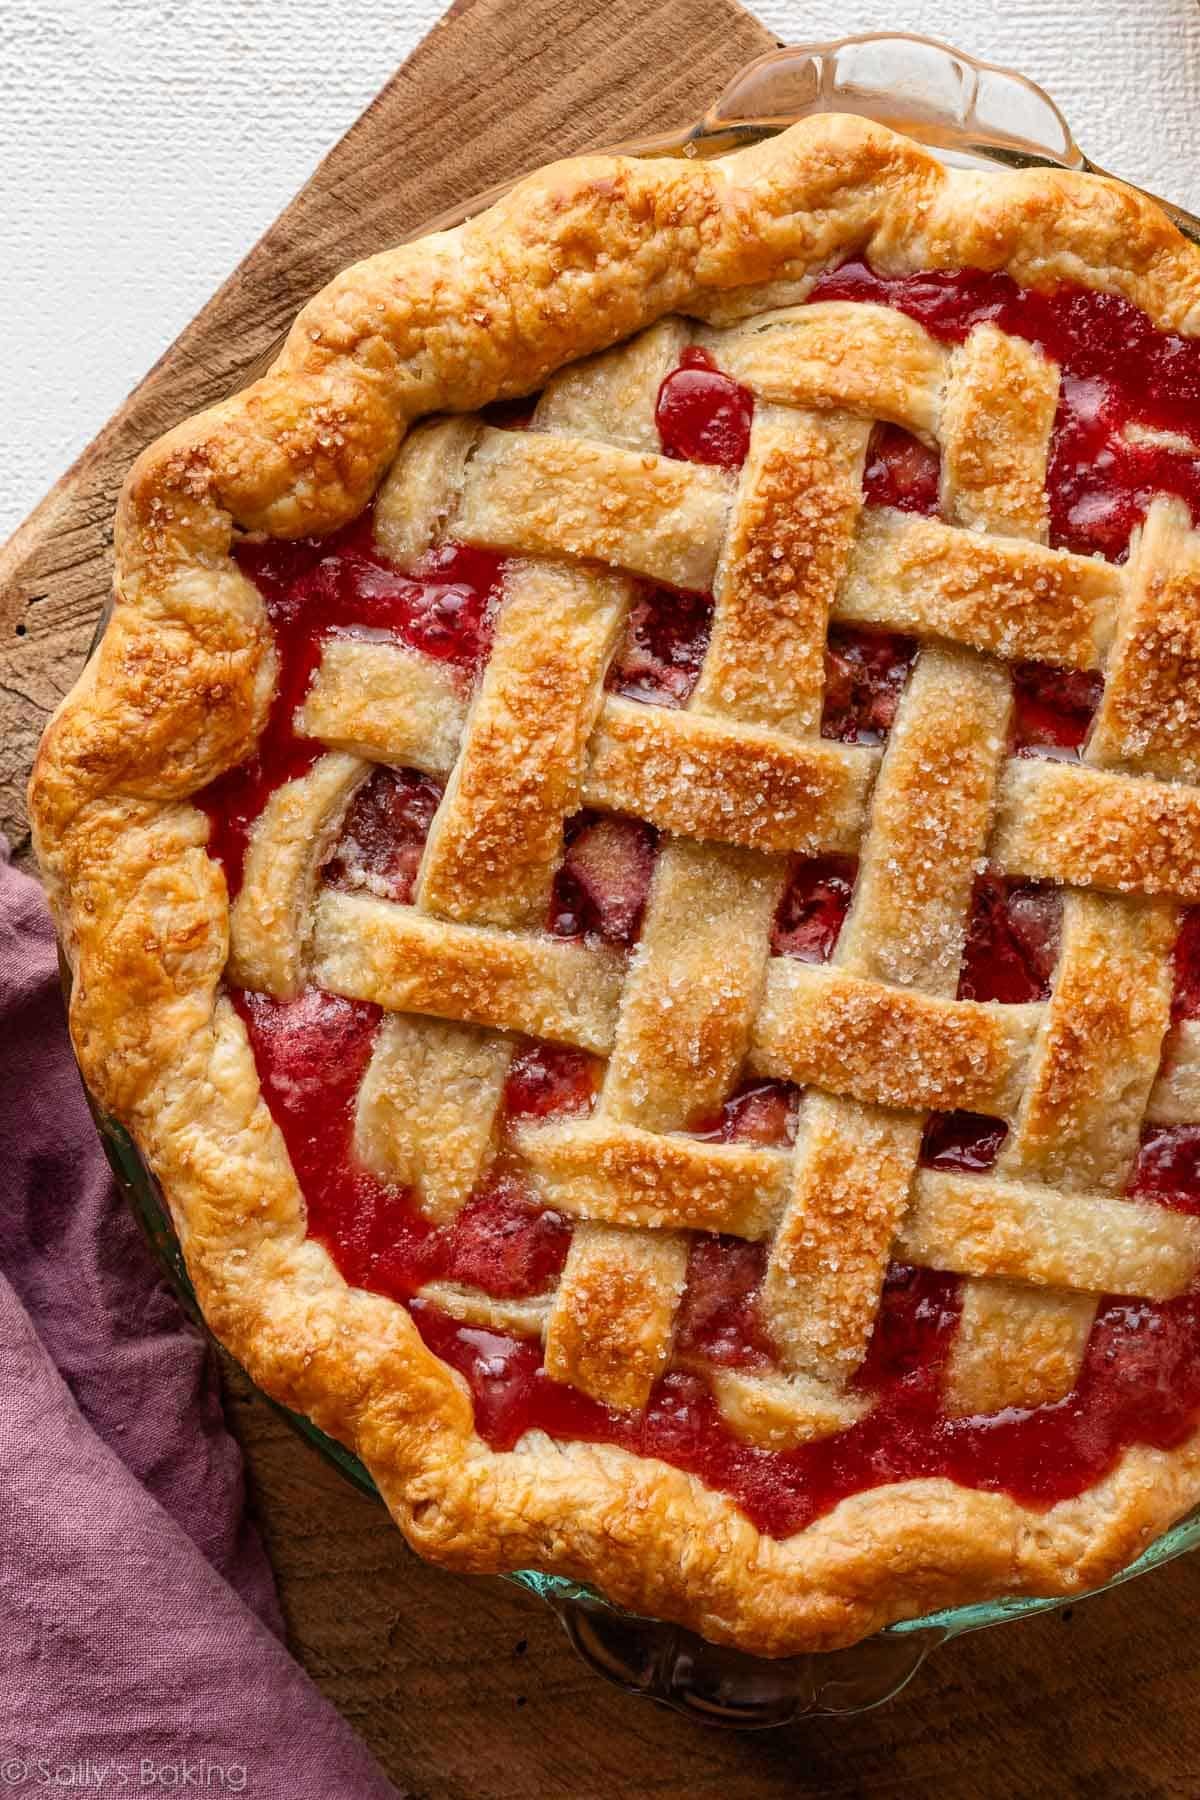
How you can Inform When Your Pie Is Finished
The pie is finished when the filling is effervescent up by the lattice and across the edges of the pie. For a extra correct check of doneness, examine the pie with an instant-read thermometer; the interior temperature ought to attain not less than 200–212°F (nearly 100°C).
This is likely to be the toughest half: you must let it cool for a number of hours. Throughout this time, the filling thickens and totally units. Should you minimize into it too quickly, it will be runny—regardless of how nicely you baked it.
Success Suggestions for the Greatest Strawberry Rhubarb Pie
- Pre-cook the filling juices on the range to activate the cornstarch and scale back the liquid.
- Don’t shorten the lengthy cooling time as a result of the filling wants a number of hours to totally set.
- Bake the pie over a baking sheet to catch any bubbling-over juices.
- Begin baking at a excessive temperature, then scale back the oven temperature and add a pie crust defend.
Should you’re fortunate sufficient to snag a slice of this pie throughout rhubarb’s brief season, you’ll know why it tastes further particular. Rhubarb’s complete life objective is to finish up on this dessert. Bake it whereas you may get it!
Description
This strawberry rhubarb pie combines candy strawberries, tart rhubarb, and a flaky buttery pie crust with a thick, jammy filling that slices fantastically. Consists of loads of success ideas to assist forestall a runny pie filling.
- The crust: Put together both pie crust recipe by step 5. The pie dough wants to relax within the fridge for not less than 2 hours earlier than utilizing.
- Make the filling: In a big bowl, stir the rhubarb, strawberries, brown sugar, granulated sugar, cornstarch, salt, orange juice, and vanilla collectively till completely mixed. Put aside.
- Roll out the chilled pie dough: On a floured work floor, roll out 1 disc of chilled dough (preserve the opposite one within the fridge). Flip the dough a few quarter flip after each few rolls till you’ve got a circle 12 inches in diameter. Rigorously place the dough right into a 9-inch pie dish. Tuck it in together with your fingers, ensuring it’s easy. Use a slotted spoon to switch the filling into the crust. If in case you have leftover juices within the backside of the bowl, reserve them for the following step. Refrigerate the pie, uncovered, as you scale back the juice within the subsequent step.
- Optionally available—scale back the juices: In case your pie filling sat for awhile or in case your strawberries are significantly juicy, a number of liquid might pool on the backside of the bowl. Pour the leftover liquid right into a small saucepan. Prepare dinner over medium-low warmth, stirring always, till the juice has barely diminished and thickened, about 3–4 minutes. Cool for five minutes, then pour over the filling within the pie crust. Do your finest to softly toss along with the fruit. Dot the items of chilly butter on high of the filling. Place the pie within the fridge when you roll out the highest crust.
- Prepare the lattice: Take away the opposite disc of pie dough from the fridge. Roll the dough right into a circle 12 inches in diameter. Utilizing a pastry wheel, sharp knife, or pizza cutter, minimize the dough into strips about 1-inch vast. Rigorously thread the strips over and beneath each other, pulling again strips as essential to weave. See this put up on How you can Lattice Pie Crust for assist with this step. Press the perimeters of the strips into the underside pie crust edges to seal. Use kitchen shears or a small paring knife to trim off extra dough. Flute or crimp the pie crust edges.
- Utilizing a pastry brush, frivolously brush the highest and edges of the pie crust with egg wash. Sprinkle the highest with coarse sugar, if utilizing. Place the pie within the fridge for 20–half-hour whereas your oven preheats.
- Preheat oven to 400°F (204°C).
- Place the pie on the middle oven rack, and place a baking sheet (lined with parchment paper for straightforward cleanup) on the rack beneath it, to catch any bubbling-over juices. Bake for 20 minutes. Retaining the pie within the oven, scale back the temperature to 375°F (190°C), add a pie crust defend, and bake for an extra 50 minutes or till the highest crust is golden brown and the filling juices are effervescent across the edges and/or by the lattice. For a extra correct check of doneness, examine the interior temperature with an instant-read thermometer; it ought to attain not less than 200–212°F (round 100°C).
- Take away pie from the oven and place on a cooling rack. Cool for not less than 4 hours earlier than slicing and serving. The filling can be too juicy if the pie continues to be heat while you slice it.
- Cowl leftovers tightly and retailer at room temperature for as much as 2 days or within the fridge for as much as 5 days.
Notes
- Make Forward & Freezing Directions: There are a pair methods to make this pie forward of time. Put together the pie in full 1 day prematurely. After the pie cools, cowl tightly and preserve at room temperature. The pie crust dough will also be ready forward of time and saved within the fridge for as much as 5 days or within the freezer for as much as 3 months. Baked pie additionally freezes nicely for as much as 3 months. Thaw in a single day within the fridge and permit to come back to room temperature earlier than serving.
- Particular Instruments (affiliate hyperlinks): Glass Mixing Bowl | Rolling Pin | 9-inch Pie Dish | Small Saucepan | Pastry Wheel or Pizza Cutter | Pastry Brush | Coarse Glowing Sugar | Baking Sheet | Pie Crust Protect | On the spot-Learn Thermometer | Cooling Rack
- DIY Pie Crust Protect: You can also make your personal disposable pie crust defend from a chunk of aluminum foil. Fold a 12-inch sq. of foil in half, and minimize a half-circle within the heart of the folded edge. When unfolded, you’ll have a foil sq. with a circle minimize out of the middle. Place it over the pie and punctiliously tuck the perimeters down across the crust.
- Pie Dish: I strongly suggest baking this pie in a glass pie dish so you possibly can simply monitor the underside crust’s browning. Glass pie dishes additionally bake pie crusts extra evenly than ceramic dishes.
- Use Recent, Not Frozen: I strongly suggest contemporary strawberries and contemporary rhubarb on this pie. Frozen fruit releases an excessive amount of extra liquid and might result in a soupy filling.
- Why Are We Decreasing the Liquid on the Range? In case your fruit is particularly ripe or juicy, don’t skip the elective stovetop discount step (step 4). It helps activate the cornstarch and ensures a thicker filling.