


In case you’ve ever needed to study the best way to make tempeh at residence however felt intimidated by the method, right here’s the shortcut: skip complete beans.
Why Break up Peas Make Tempeh Simpler
I’ve been making tempeh for over 6 years and over time, I’ve discovered that if I’ve to hull the beans myself, I’ll merely procrastinate. Conventional soybean tempeh requires a number of preparation steps earlier than fermentation may even start:
- Soaking
- Eradicating the hulls
- Splitting the beans
- Cooking
- Drying
I’ve tried on the lookout for cut up soybeans however haven’t been capable of in Canada at a worth that is smart. However fortunately there are cut up legumes on the grocery retailer that work simply as nicely! Break up peas remove among the most tedious work instantly. As a result of they’re bought already cut up and dehulled, you possibly can skip the labor-intensive prep that daunts many first-time tempeh makers.
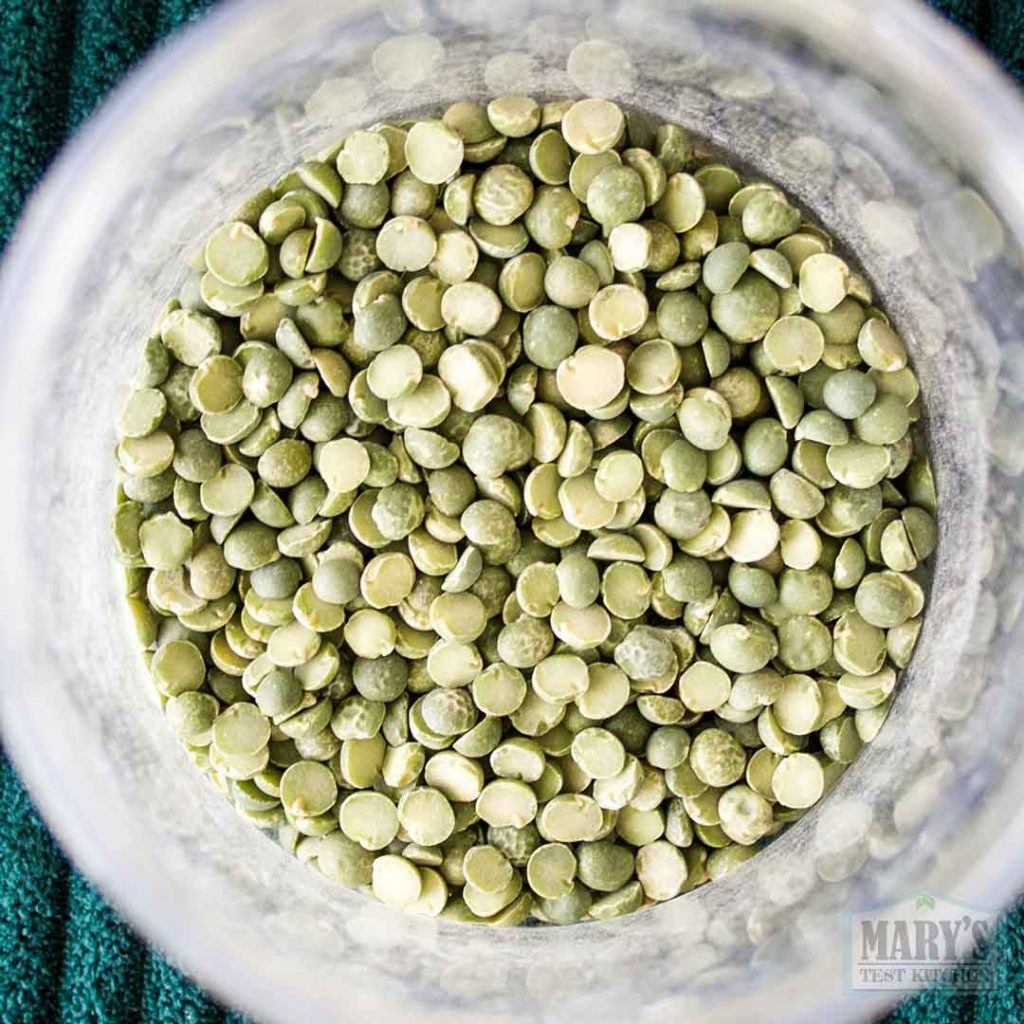
The dearth of hulls isn’t simply handy; it additionally improves your odds of success. The fungus used to make tempeh, Rhizopus oligosporus, grows greatest when it will possibly simply colonize the floor of every piece of legume. Extra hull materials can sluggish progress and result in patchy mycelium improvement.
The result’s cleaner-looking tempeh with extra dependable fermentation.
What You’ll Want
- dried cut up peas or different cut up legumes ( I used 3/4 cup or 150 grams of cut up peas for the primary batch and in addition made a batch with fava beans within the video above)
- 1 teaspoon vinegar (or multiply for bigger batches)
- Tempeh starter tradition containing Rhizopus oligosporus
- A shallow container, tray, or perforated plastic bag
- A heat place for incubation
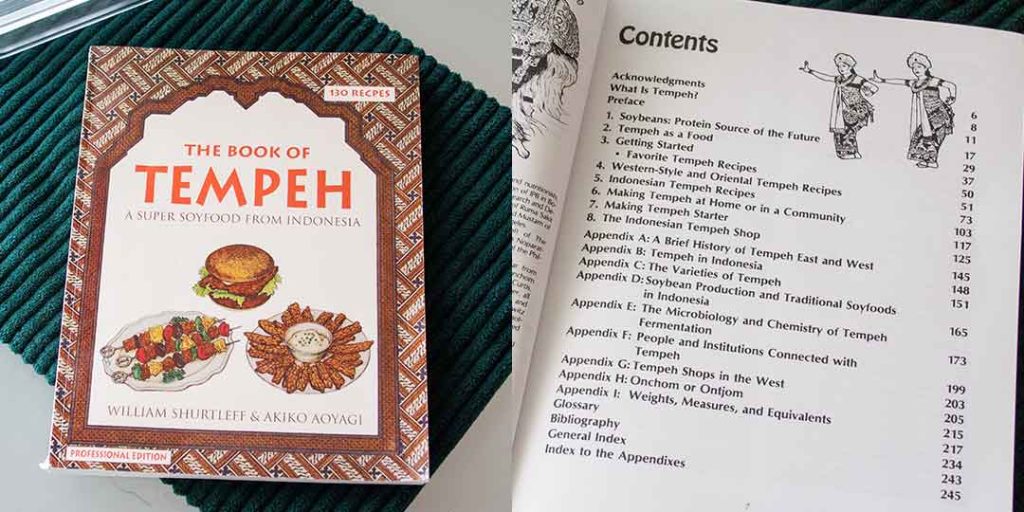
You don’t want it as there are many tempeh assets on-line, however I discovered The Guide of Tempeh by Shurtleff and Aoyagi very useful over my 6 12 months tempeh-making journey. It’s an amazing reference that totally explains the whole lot about tempeh: the best way to make it at residence, at a bigger scale, and commercially; the kinds of tempeh you may make and which to keep away from; recipes (each Western and Indonesian); historical past; and even the chemistry of tempeh.
About Tempeh Starter
I used business tempeh starter from Cultures for Well being however you received’t have to purchase new starter each time. When you’ve efficiently made tempeh, you possibly can harvest spores from mature tempeh and create your individual starter tradition for future batches.
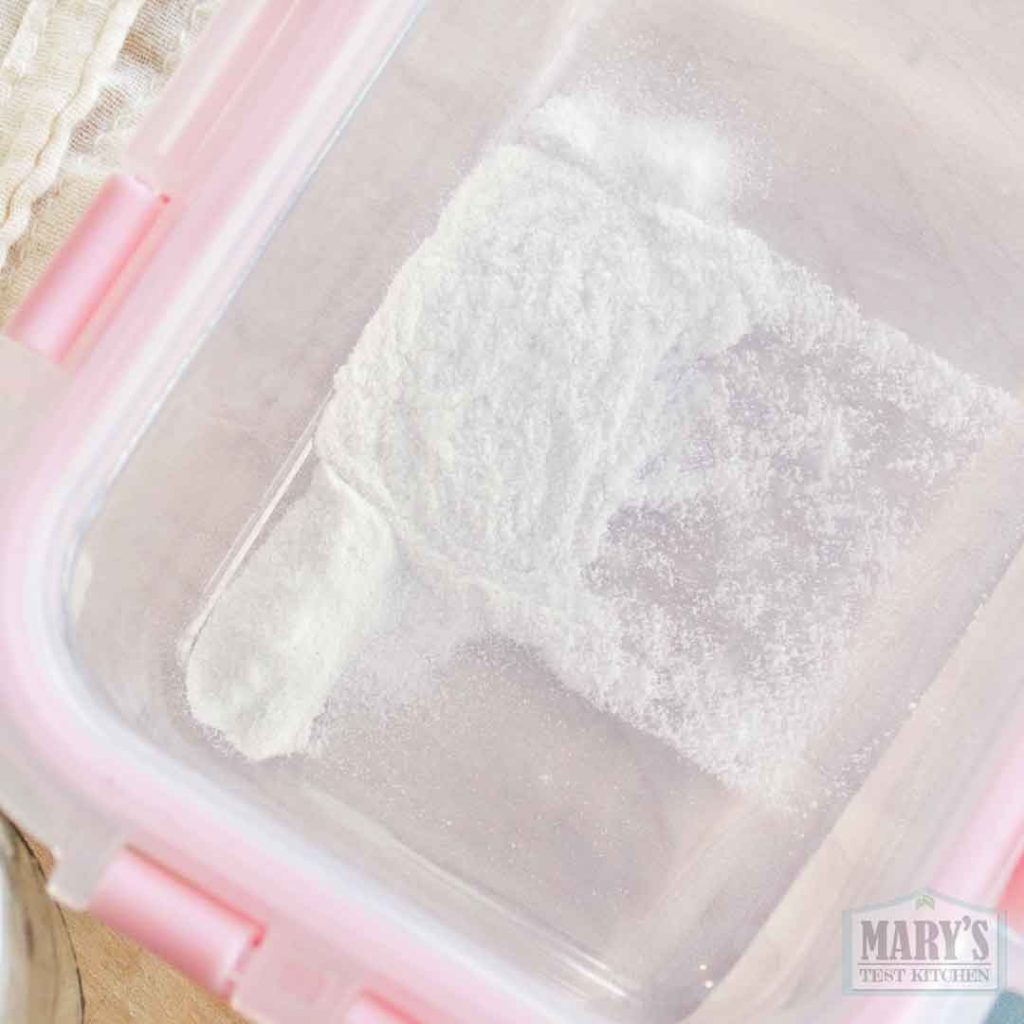
Starter cultures will change into much less efficient over time. However business freeze-dried cultures can final a surprisingly very long time. For instance, regardless that the starter I used within the video was unearthed from the again of my fridge and was expired 5 years in the past, it nonetheless labored fairly nicely as you possibly can see within the video.
Then again, selfmade starters ought to actually be used throughout the first month even in case you retailer it within the fridge.
In case you or anybody you’ll be sharing tempeh with is allergic to soy, select a soy-free starter.
Step 1: Soak the Break up Peas
This step is technically non-compulsory, however extremely really helpful.
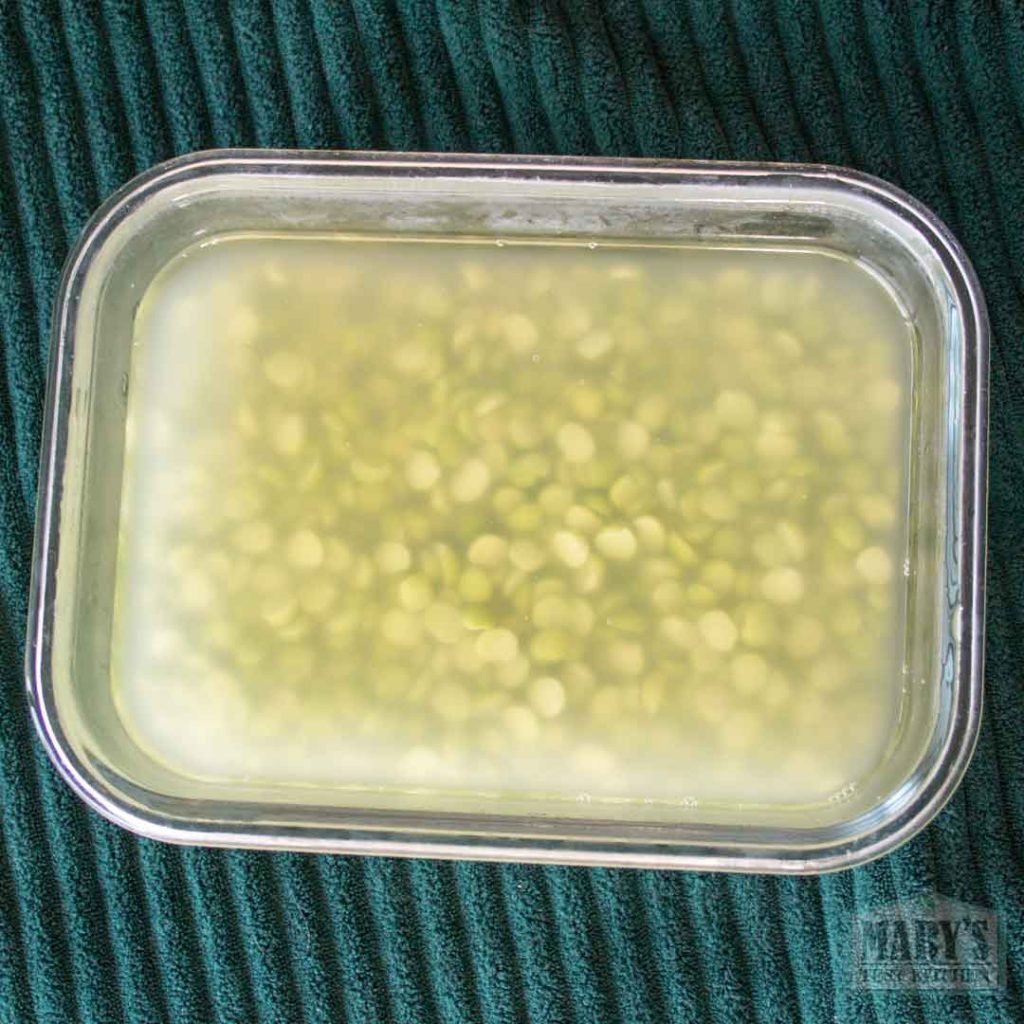
Cowl the cut up peas with water and soak them in a single day. The soak helps them prepare dinner extra evenly and reduces cooking time. In case you’re feeling adventurous, this technique works nicely with cut up fava beans too.
Step 2: Prepare dinner Till Tender however Not Mushy
The aim is absolutely cooked legumes that also maintain their form.
You’ll be able to prepare dinner cut up peas in a pot on the range or in a rice cooker. Whereas strain cookers and On the spot Pots can work, they’re extra more likely to overcook the peas, leading to a mushy texture that makes fermentation harder.
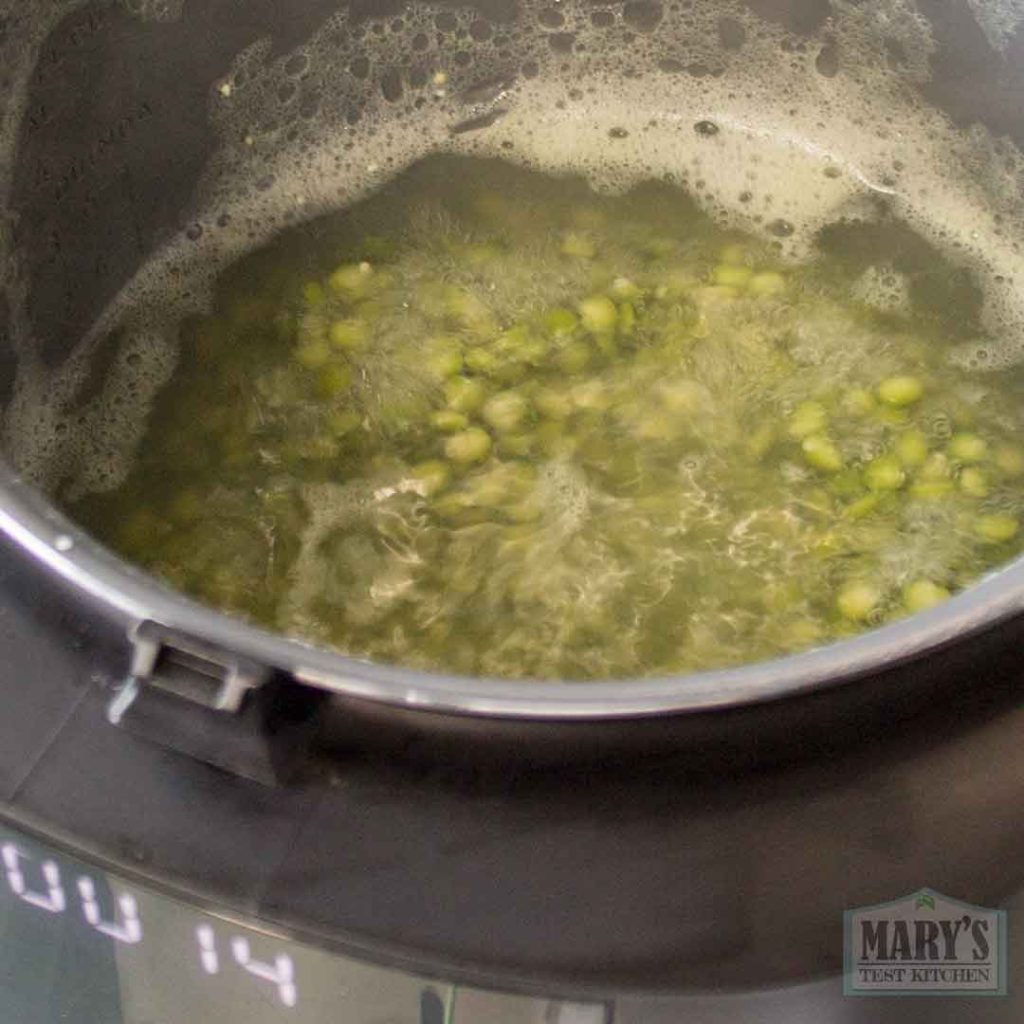
Prepare dinner the peas till they’re tender sufficient to chunk by way of however not falling aside. Mushy legumes are nice for a lot of issues however not supreme for tempeh.
Step 3: Drain and Acidify
As soon as the peas are cooked, drain them totally and return them to the nice and cozy pot.
Stir in about 1 teaspoon of vinegar.
Acidifying the legumes helps create an atmosphere that favors Rhizopus oligosporus whereas discouraging undesirable micro organism and molds. Most fashionable tempeh-making strategies embrace this straightforward however efficient step.
Step 4: Dry the Floor
This is among the most vital and most ignored steps in tempeh making.
The fungus wants moisture, nevertheless it doesn’t like moist surfaces. Enable the residual warmth from the pot to evaporate extra moisture whereas stirring often.
The peas ought to really feel moist inside however dry on the floor. There needs to be no seen water droplets on the legumes or within the pot.
In case you’re uncertain whether or not they’re dry sufficient, wait a couple of extra minutes. Barely too dry is mostly simpler to get well from than too moist.
Step 5: Cool Earlier than Including the Starter
Tempeh starter accommodates residing spores. If the peas are too sizzling, you’ll kill them earlier than fermentation even begins.
Switch the peas to a clear container and permit them to chill to roughly physique temperature.
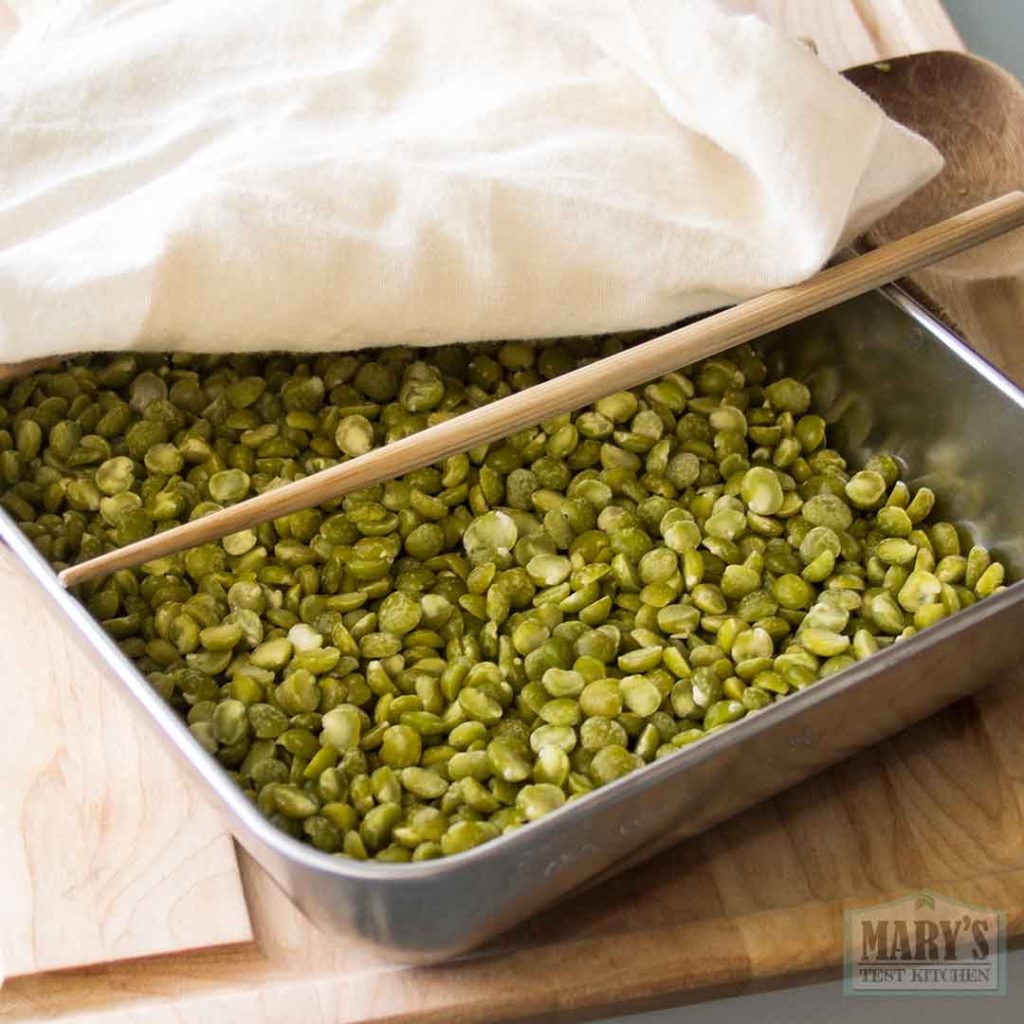
Many skilled tempeh makers use a thermometer, but when the peas really feel comfortably heat relatively than sizzling, they’re often prepared for inoculation.
Cowl them with a clear lint-free material whereas they cool to maintain mud and pet hair away.
Step 6: Combine within the Starter Totally
The Starter package deal will often let you know how a lot to make use of for the quantity of dry ingredient you began with. The pack I used within the video was really expired for 5 years already so I guesstimate that one packet (3 grams) would work for my 3/4 cup of dried cut up peas (and I guessed proper!). Nonetheless, usually, it might be sufficient for two cups.
Sprinkle the starter evenly over the cooled peas and blend totally.
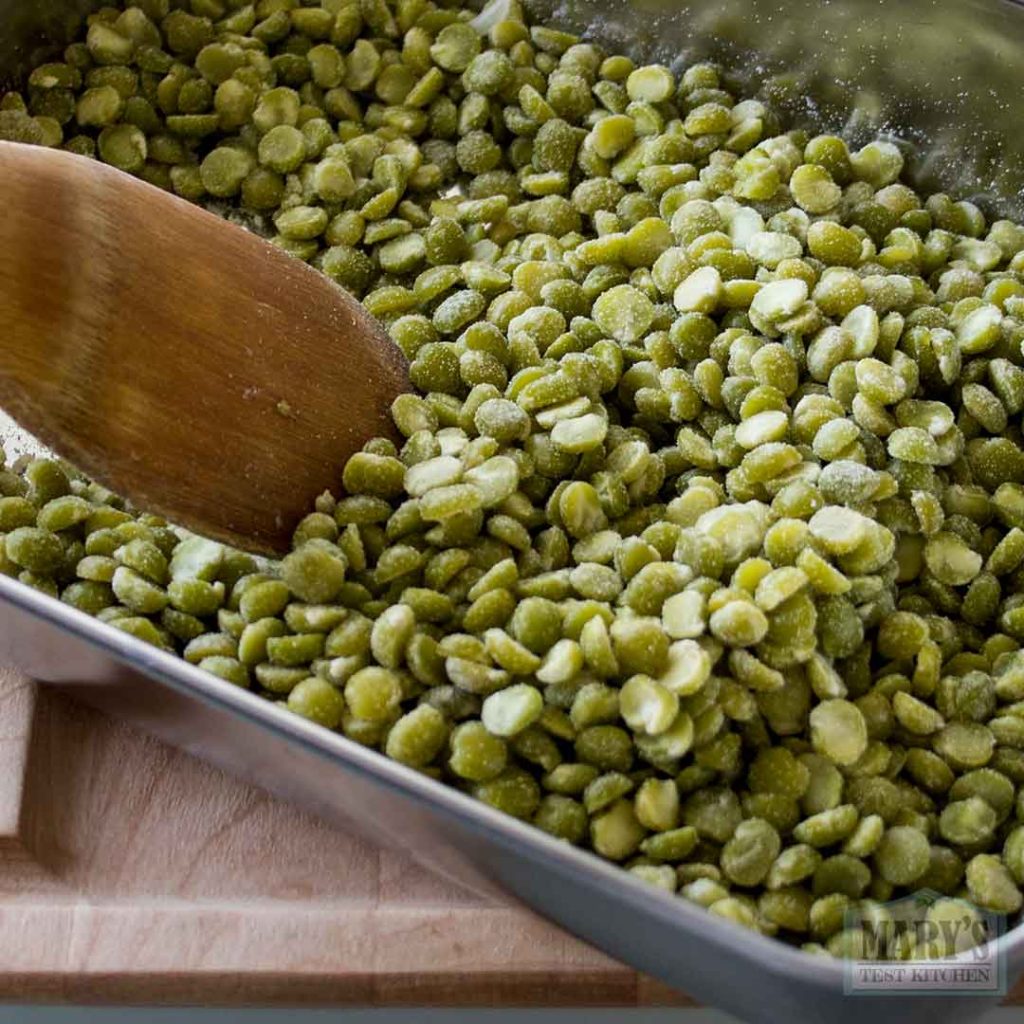
Good distribution is crucial. Each pea ought to have an opportunity to come back into contact with spores.
Patchy progress in a while is commonly the results of uneven mixing at this stage.
Step 7: Bundle for Fermentation
In contrast to many different ferments, tempeh requires oxygen. Rhizopus oligosporus is an cardio fungus and wishes airflow to develop correctly.
You’ll be able to incubate tempeh in:
- A perforated plastic bag
- A shallow tray lined with perforated plastic wrap
- A ventilated container with small air holes drilled into the lid.
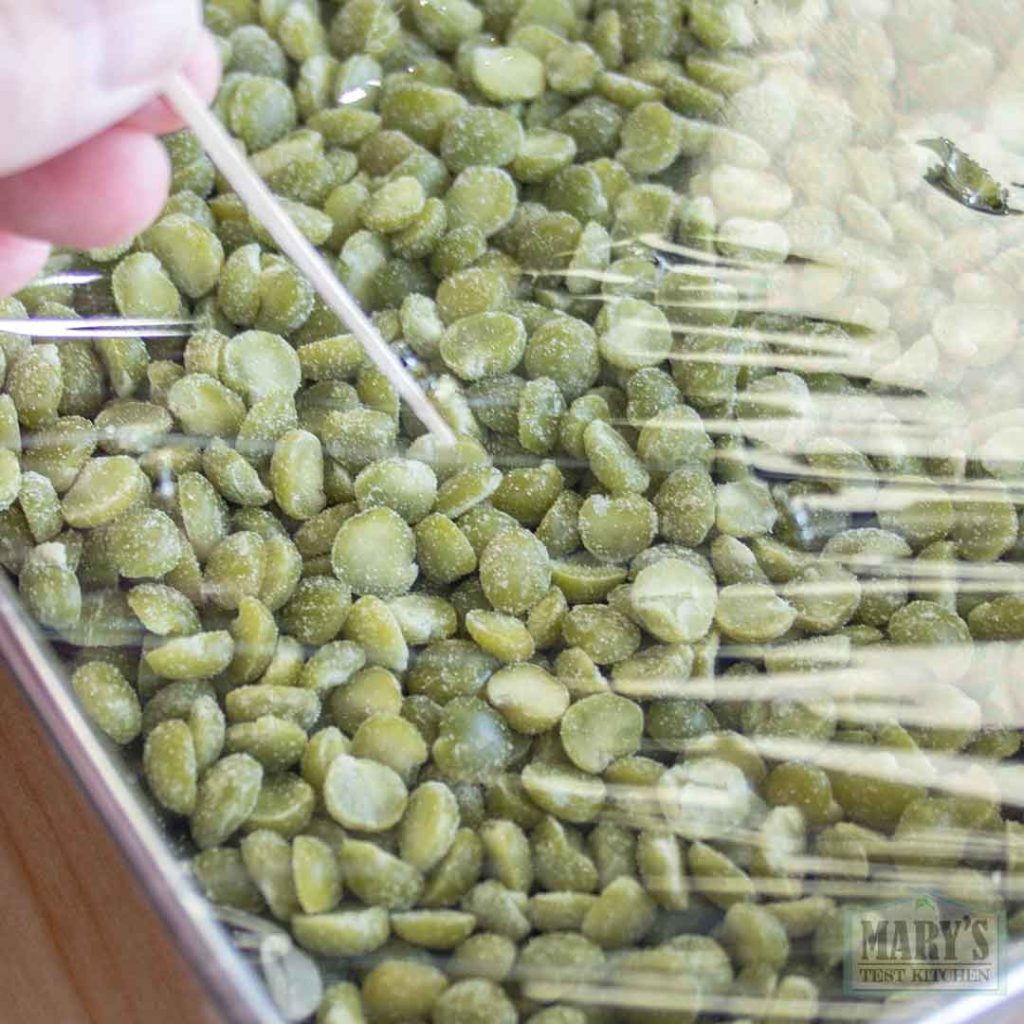
Have the holes about 1″ aside. Hold the layer of peas comparatively skinny, about 1 to 1½ inches (2.5–4 cm) thick. Skinny layers are simpler to incubate evenly and are extra forgiving for tempeh newbies.
Step 8: Incubate Heat
The perfect incubation temperature is between 86°F and 88°F (30–31°C).
That sounds exact, however tempeh is commonly extra forgiving than individuals anticipate. You don’t want laboratory circumstances to make profitable tempeh.
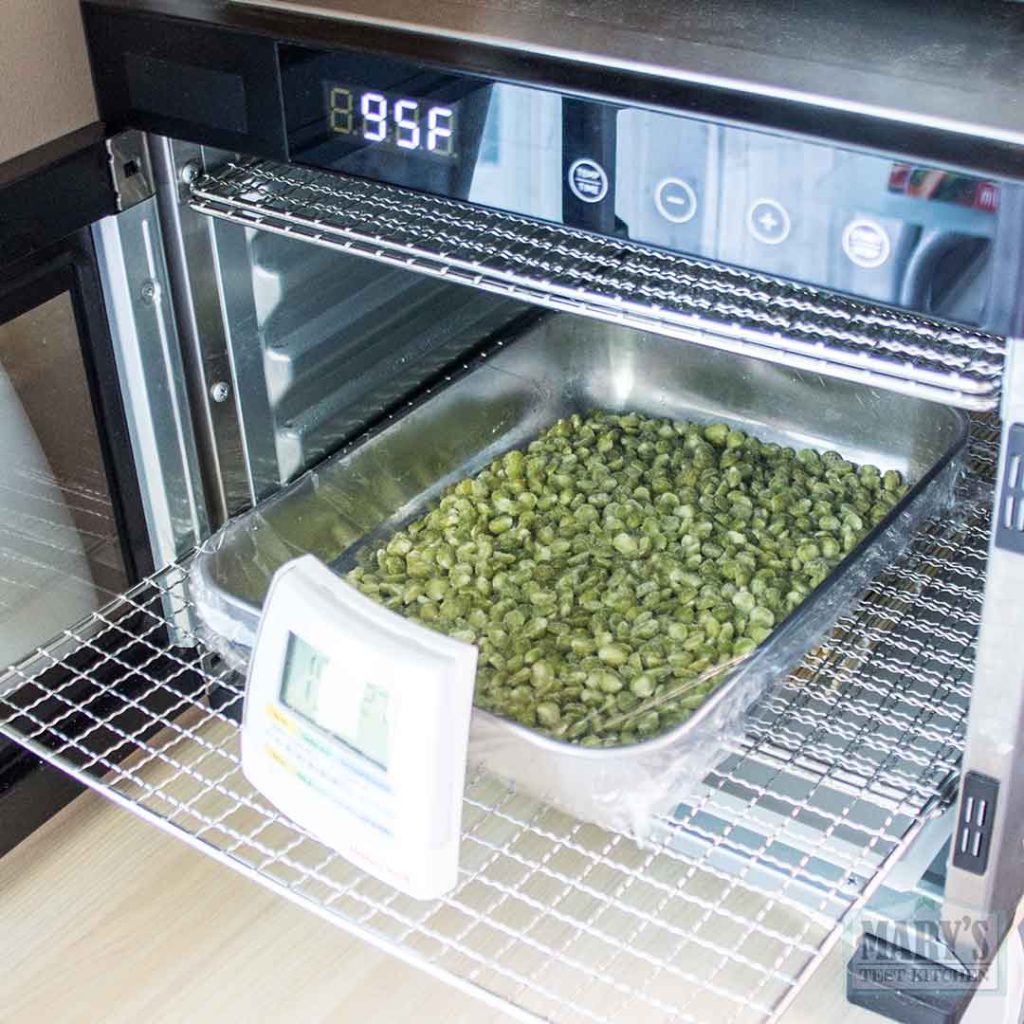
Widespread incubation strategies embrace:
- A dehydrator
- An oven with solely the sunshine turned on
- A proofing field
- A multicooker with yogurt setting (Like an On the spot Pot)
- Air Fryer with a proof setting (Just like the Cosori TurboBlaze)
For all of the “field incubation” strategies, you should use an affordable moveable thermometer to substantiate the ambient temperature and alter as essential. Some individuals will even use a probe thermometer within the tempeh. For me, that’s overkill however no matter makes you’re feeling extra comfy about fermentation at residence 🙂
Attempt to preserve temperatures above 80°F (27°C) and under 95°F (35°C). Development slows considerably when it’s too cool and might stall totally if it turns into too sizzling.
Don’t anticipate any seen exercise throughout the first 12 hours. That’s regular.
What to Anticipate Throughout Fermentation
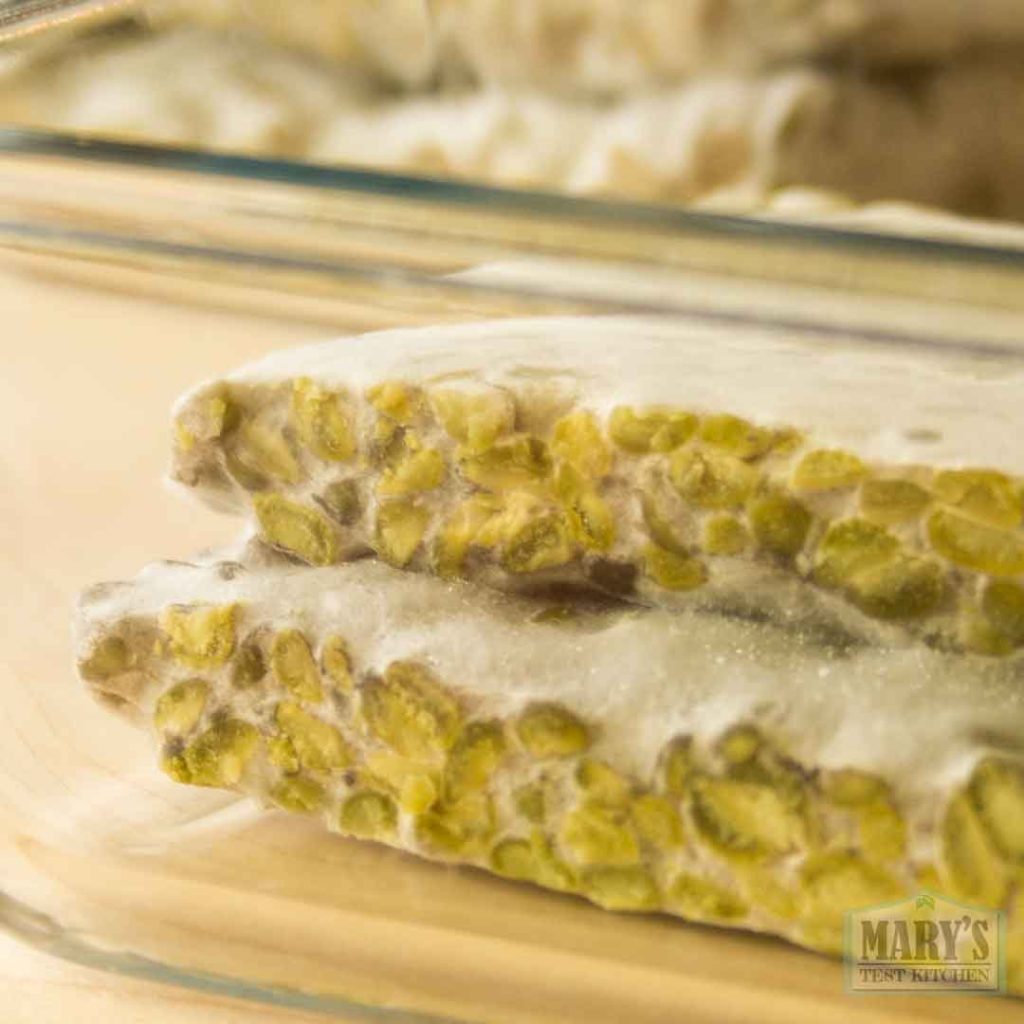
After about 24 hours, you need to start to see white mycelium spreading between the peas.
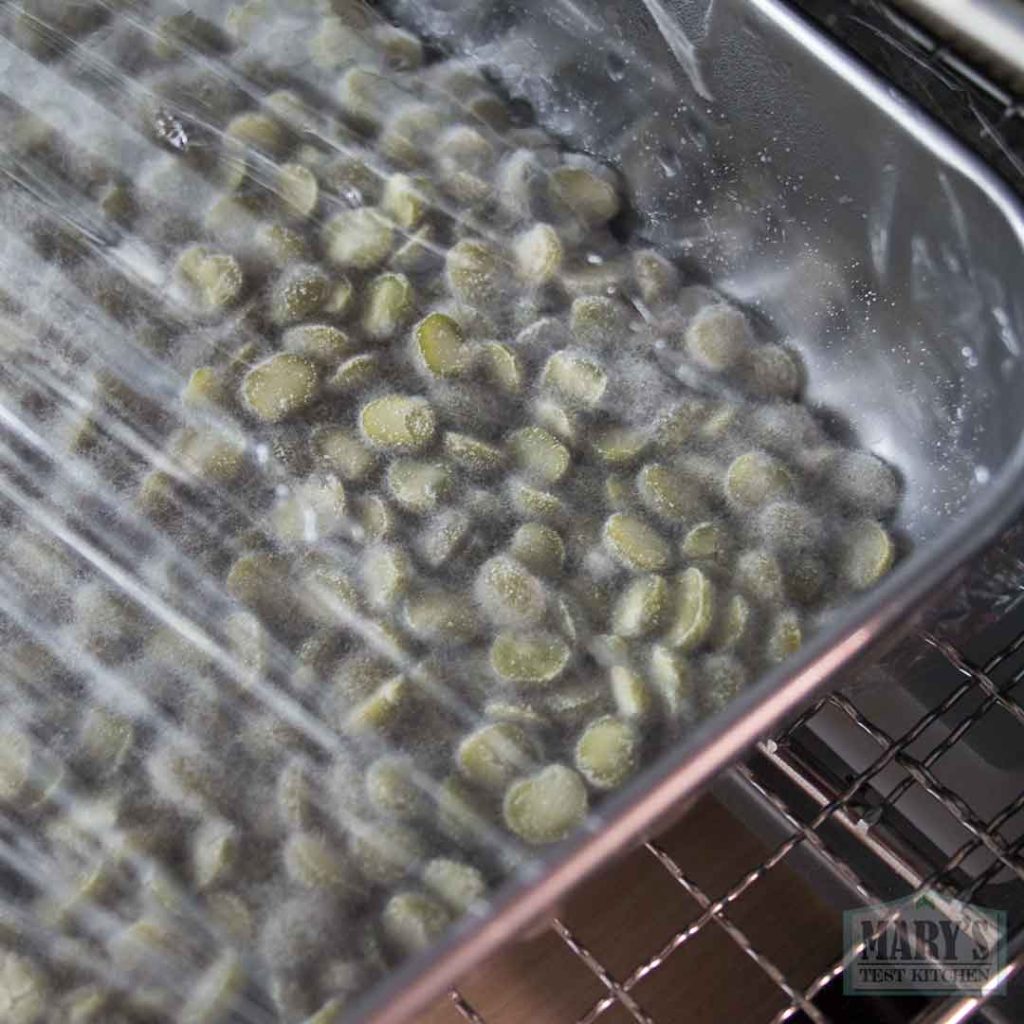
Because the fungus grows, it binds the legumes collectively right into a stable cake. You might also discover the tempeh producing its personal warmth. This can be a signal that fermentation is lively and wholesome. Due to this, you possibly can flip off or take away any exterior sources of warmth at the moment.
Relying on temperature, the tempeh could take wherever from 24 to 48 hours to completely mature.
Tips on how to Inform When Tempeh Is Prepared
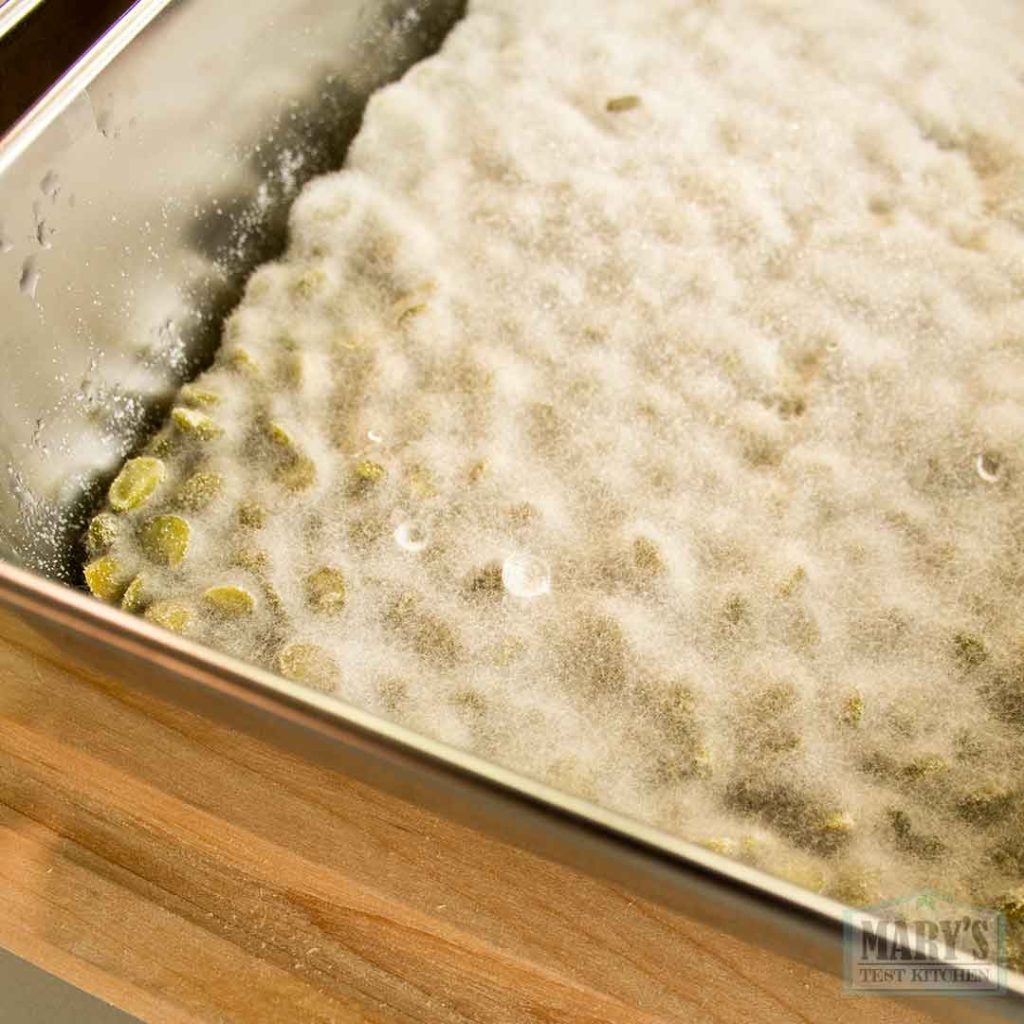
Wholesome tempeh ought to:
- Be lined in white mycelium
- Maintain collectively firmly when dealt with
- Have a pleasing mushroom-y aroma
- Scent mildly candy, nutty, or bread-like
Contemporary tempeh usually smells just like mushrooms, contemporary steamed bao (bread), or gentle Brie cheese.

Indicators Your Tempeh Has Gone Too Far
Tempeh doesn’t cease fermenting till you refrigerate it.
If allowed to proceed rising for too lengthy, it could develop:
- Grey or black spores
- Alcohol-like aromas
- Robust ammonia smells
Whereas sporulation isn’t harmful, most tempeh newbies discover the flavour much less nice. I want to cease the fermentation earlier than any ammonia notes develop.
When unsure, refrigerate barely early relatively than barely late.
Do You Have to Prepare dinner Tempeh Earlier than Consuming It?
Most meals security consultants advocate cooking tempeh earlier than consumption.
Thankfully, it’s extremely versatile. You’ll be able to:
- Steam it
- Boil it
- Braise it
- Pan-fry it
- Bake it
- Air fry it
- Grill it
Consider it the identical method you’d use tofu or cooked meat in recipes.
Tempeh usually tastes like the unique ingredient it was produced from, with a refined mushroomy complexity added by the fermentation. And the mycelium simply absorbs flavours throughout marination or simmering.
Storage Ideas
Contemporary tempeh is greatest loved quickly after it’s completed fermenting.
Retailer it within the fridge for a couple of days or freeze it for longer-term storage.
Freezing has little impact on high quality and is an effective way to maintain selfmade tempeh available for future meals.
The Backside Line
If conventional soybean tempeh has at all times appeared like an excessive amount of work, skip the soybeans.
Break up peas are cheaper, simpler to seek out, require much less preparation, and produce scrumptious tempeh with little or no hands-on effort. The fermentation itself isn’t the exhausting half. Eradicating soybean skins is.
By beginning with cut up peas, you’ll spend much less time prepping and extra time having fun with some of the scrumptious, nutritious, and underrated fermented meals on the planet.
The Best Approach to Make Tempeh at Residence2026-06-072026-06-07https://www.marystestkitchen.com/wp-content/uploads/2013/06/mtk_sign_logo1.jpgMary’s Check Kitchenhttps://www.marystestkitchen.com/wp-content/uploads/2026/06/ft-split-pea-tempeh-green.jpg200px200px